
-min.jpg "How to Use Iron-On with Cricut (Easy Heat Vinyl DIY)")
How to Use Iron-On with Cricut (Easy Heat Vinyl DIY)
Ever dreamed of making your own custom t-shirts, tote bags, or personalized gifts?
Learning how to use Cricut Iron-On Vinyl—also known as heat transfer vinyl (HTV)—is one of the most rewarding projects you can do.
-min.jpg "How to Use Iron-On with Cricut (Easy Heat Vinyl DIY)")
The process is surprisingly simple once you understand a few key principles, and the results look totally professional.
Despite the rise in sublimation, Direct-to-Film (DTF) Transfers and all the new printers, iron-on vinyl still holds useful, fun and easy to use!
-min.JPG "How to Use Iron-On with Cricut (Easy Heat Vinyl DIY)")
IRON-ON VINYL is HEAT TRANSFER VINYL
Whether you’re using a Cricut Maker, Cricut Explore Air, or the compact Cricut Joy, the technique is the same.
Cricut Cutting Machine:
You’ll design your image in Cricut Design Space, cut your special type of vinyl material shiny side down, weed away the excess vinyl, and then use heat to transfer the design permanently onto your fabric.
-min.JPG "How to Use Iron-On with Cricut (Easy Heat Vinyl DIY)")
In this ultimate guide, I’ll walk you through every single step of iron-on vinyl with Cricut— from design setup and mirroring to pressing and care instructions.
These step-by-step instructions will help you get the best results for every project.
-min.JPG "How to Use Iron-On with Cricut (Easy Heat Vinyl DIY)")
What is Cricut Iron-On Vinyl?
Cricut’s iron-on vinyl (also called heat transfer vinyl, or HTV) is a special type of vinyl material designed to adhere to fabric or other heat-safe base materials.
Unlike regular vinyl, which uses adhesive backing, iron-on vinyl has a heat-sensitive adhesive that bonds when pressed under high heat using a Cricut EasyPress, heat press, or even a household iron.
-min.jpg "How to Use Iron-On with Cricut (Easy Heat Vinyl DIY)")
HTV comes in many types and finishes: Everyday Iron-On, Smart Iron-On, Glitter Iron-On, Foil Iron-On, and more.
Each has its own personality, perfect for multi-colored images, layered designs, and different materials.
The main difference between iron-on vinyl and adhesive vinyl is simple: adhesive vinyl sticks to smooth surfaces like glass, plastic, and walls—while heat transfer vinyl melts slightly and fuses into fabric fibers for a smooth, flexible finish.
EasyPress:
- Cricut EasyPress 3 (9x9)
- Cricut EasyPress 2 (12x10)
- Cricut EasyPress 3 (12x10 with mat)
- Cricut Easy Press Mini (great for small things)
- HTVRONT Heat Press 10x10
-min.JPG "How to Use Iron-On with Cricut (Easy Heat Vinyl DIY)")
Step 1: Gather Your Materials
Before you start your iron-on projects, gather the supplies you’ll need. Having everything within reach makes the process smoother and faster.
Heat Transfer Vinyl/Iron-On:
- Cricut Value Heat Transfer Vinyl 20 pack
- HTVRONT 20 Rolls HTV
- Cricut iron-on vinyl
- Cricut Value Iron-on Rolls (12 x 5ft)
- HTVRONT Heat Transfer Vinyl 12x12 pack
- Cricut Value Iron-on Material Rolls (12 x 3ft)
- Cricut Everyday Iron-on 3 Rolls
- Infusible Ink Transfer Sheets
Puff Vinyl:
-min.jpg "How to Use Iron-On with Cricut (Easy Heat Vinyl DIY)")
Supplies Needed for Iron-on Vinyl Shirt:
- Cricut Machine: Any model works—Cricut Maker, Cricut Explore Air, or Cricut Joy.
- Cricut Iron-On Vinyl
- Cricut Mat: Use a Standard Grip cutting mat (green).
- Cricut EasyPress 3 (12x10 with mat) (I strongly discourage the use of a household iron)
- Cricut EasyPress Mat or Pressing Mat.
- Fabric Base Material: T-shirt, tote bag, apron, pillow cover, etc.
- Lint roller
- Parchment Paper, or Teflon sheet.
- Tee Shirt Design (FREE Funny Shirts File at the end of this post)
- Weeding Tool
- Cricut Heat Guide
- Heat Resistant Tape
- Cricut Brightpad (Not necessary but it can be a huge help to make weeding easier)
-min.JPG "How to Use Iron-On with Cricut (Easy Heat Vinyl DIY)")
Step 2: Design in Cricut Design Space
Open Cricut Design Space and click “New Project.”
You can design your own image or upload SVG files from your computer, a Facebook group, or your favorite YouTube channel.
You can also browse pre-made designs in Design Space — everything from quotes to holiday art to geekery graphics.
-min.jpg "How to Use Iron-On with Cricut (Easy Heat Vinyl DIY)")
Design Tips:
Mirror the image: This is absolutely essential for iron-on vinyl because it cuts backward. You’ll be placing the shiny side (the clear carrier sheet) down on your mat, so you need to mirror image your design before cutting.
Choose different fonts and experiment with different colors for your layers if desired.
Adjust size according to your base material—t-shirts for adults, kids, or small projects like tote bags.
On the next screen, choose Iron-On as your material setting.
💡 Pro Tip: Always do a test cut on a small piece before committing to your entire design. It’ll save you from wasting vinyl!
-min.jpg "How to Use Iron-On with Cricut (Easy Heat Vinyl DIY)")
Step 3: Cut the Vinyl
This step is where your Cricut machine shines—literally.
Step-by-Step:
Place your iron-on vinyl shiny side down on your cutting mat. The shiny plastic carrier sheet protects the vinyl during pressing, so it faces the mat. The dull side (the heat-activated adhesive side) faces up.
Use a scraper tool or your hand to smooth out bubbles.
Load your mat into the Cricut Maker, Explore Air, or Joy by pressing the arrow button.
Select Iron-On as your material in Design Space, double-check that Mirror is turned on, and click “Make It.”
Let your Cricut Glow light guide you as it cuts through the vinyl with precision.
Once it’s done cutting, unload the mat and peel the vinyl sheet away gently.
-min.jpg "How to Use Iron-On with Cricut (Easy Heat Vinyl DIY)")
Step 4: Weed the Vinyl
Now it’s time to weed—which means removing all the excess vinyl around your design, leaving only the shapes and letters you want to press.
Use your weeding tool to lift away the negative space, starting from the corners and working slowly. Intricate designs and small pieces can be tricky, so good lighting really helps.
If your design includes fine details, use the tip of your tool to pop out small bits. This part can feel tedious at first, but it’s incredibly satisfying when you reveal your perfect mirror image on the clear carrier sheet.
-min.jpg "How to Use Iron-On with Cricut (Easy Heat Vinyl DIY)")
💡 Pro Tip: If you’re working with glitter iron-on or foil vinyl, warm the sheet slightly with your hand or pressing mat before weeding—it makes the vinyl lift easier.
-min.jpg "How to Use Iron-On with Cricut (Easy Heat Vinyl DIY)")
Step 5: Prepare Your Base Material
Before pressing, your base material (the fabric) needs to be smooth and clean.
Preheat your EasyPress to remove moisture and wrinkles.
Use a lint roller to remove dust or pet hair.
-min.jpg "How to Use Iron-On with Cricut (Easy Heat Vinyl DIY)")
Lay your project on a flat surface—a Cricut EasyPress mat, ironing board, or heat-safe table.
This step ensures the vinyl adheres evenly. If your shirt or tote has seams or buttons, try placing a folded towel under it to level the pressing surface.
Use heat resistant tape to hold the iron-on vinyl in place, optional but prevents slipping.
-min.jpg "How to Use Iron-On with Cricut (Easy Heat Vinyl DIY)")
Step 6: Apply Heat and Transfer Your Design
Now for the fun part — applying your design!
Use the Cricut Heat Guide (available online or in the app) to find the exact temperature, press time, and pressure for your specific iron-on material and base material.
Common Settings:
- Cricut Everyday Iron-On: 305°F (150°C) for 15 seconds
- Glitter Iron-On: 320°F (160°C) for 20 seconds
- Foil Iron-On: 295°F (145°C) for 30 seconds
-min.jpg "How to Use Iron-On with Cricut (Easy Heat Vinyl DIY)")
Cover your entire area with the clear carrier sheet (or parchment paper) to protect the vinyl.
If you’re using a Cricut EasyPress, press down with firm, even pressure.
If you are using a Heat Press, the pressure is already there for you.
-min.jpg "How to Use Iron-On with Cricut (Easy Heat Vinyl DIY)")
💡 Pro Tip: When working with multi-colored images or layered designs, press the base layer for half time first, peel gently, and then press the top layer fully.
-min.jpg "How to Use Iron-On with Cricut (Easy Heat Vinyl DIY)")
Step 7: Peel the Carrier Sheet
Depending on your vinyl type, this can be a warm peel or a cool peel.
- Warm Peel: Peel the plastic transfer sheet while still slightly warm.
- Cool Peel: Wait until the design cools completely before removing the sheet.
Start at one corner and peel slowly at an angle.
If any part lifts, place the plastic sheet back down and press again for 5–10 seconds with high heat.
-min.jpg "How to Use Iron-On with Cricut (Easy Heat Vinyl DIY)")
Step 8: Finishing Touches
Once the carrier sheet is off, cover your design with a thin pressing cloth or parchment paper and press again for 5 seconds.
This helps the heat-sensitive adhesive fully set and ensures your vinyl lasts a long time.
For extra polish, look over the edges to make sure every piece has bonded.
Your project should feel soft and smooth, not raised or peeling.
-min.jpg "How to Use Iron-On with Cricut (Easy Heat Vinyl DIY)")
Step 9: Care Instructions
- To make your iron-on designs last, follow these care tips:
- Turn clothing inside out before washing.
- Wash in cold water with mild detergent.
- Avoid high heat drying—hang dry or tumble on low.
- Never iron directly over vinyl.
- Wait 24 hours after application before washing.
If you treat your custom t-shirts well, they’ll stay beautiful for years!
-min.jpg "How to Use Iron-On with Cricut (Easy Heat Vinyl DIY)")
Troubleshooting Common Problems
- Even seasoned crafters occasionally run into issues. Here’s how to fix them:
- Vinyl not sticking: Your base material might have residue or wasn’t preheated. Try more pressure or a longer press time.
- Wrinkled design: Heat was too high. Check the Cricut Heat Guide for different settings.
- Peeling edges: Try a quick re-press under parchment paper.
- Melted vinyl: The temperature was too high—test on a scrap next time.
- Remember, every fabric reacts differently. A test cut and test press can save your project.
-min.jpg "How to Use Iron-On with Cricut (Easy Heat Vinyl DIY)")
Fun Iron-On Project Ideas
Once you’ve mastered the process, the possibilities are endless!
Now you are ready to make:
- Matching family t-shirts for holidays or vacations.
- Personalized tote bags with your name or logo.
- Funny sayings for teachers or friends.
- Custom aprons, pillowcases, and onesies for gifts.
- Layered multi-color iron-on for bold, detailed artwork.
- You can even use your own design from your favorite fandoms—think classic controller, little mermaid, or geekery doctor inspired creations.
-min.jpg "How to Use Iron-On with Cricut (Easy Heat Vinyl DIY)")
Bonus Tips for the Best Results
-min.jpg "How to Use Iron-On with Cricut (Easy Heat Vinyl DIY)")
Why You’ll Love Iron-On Vinyl Crafts
Using Cricut Iron-On Vinyl is addictive—in the best way. It’s a creative outlet that combines design, precision, and instant gratification. Once you master it, you can make personalized gifts, themed shirts, or business products that look totally professional.
-min.jpg "How to Use Iron-On with Cricut (Easy Heat Vinyl DIY)")
You can use scraps from past projects to create small projects like labels or mini decorations. The best part is that you don’t need a lot of money or a big bank account—just creativity and the right tools.
Cricut Design Space supports free files, pre-made designs, and different ways to customize, you can easily scale your iron-on projects from hobby to side hustle.
-min.jpg "How to Use Iron-On with Cricut (Easy Heat Vinyl DIY)")
Learning how to use heat transfer vinyl with a Cricut machine opens a whole new crafting world.
From everyday iron-on basics to multi-layered glitter designs, there’s always something new to try.
Take your time, experiment with different colors, test your heat settings, and always follow the care instructions for your base material.
With a little practice, you’ll get a smooth, professional finish every time.
-min.jpg "How to Use Iron-On with Cricut (Easy Heat Vinyl DIY)")
That's it!
So grab your cutting mat, prep your vinyl shiny side down, and let’s make something amazing.
Whether you’re a beginner or a Cricut pro, the best choice is always the project that makes you smile!
And these funny shirts are perfect for handmade gifts--great for the person that fixes everything or procrastinates!
Like, Pin and Save!
-minPIN.jpg "How to Use Iron-On with Cricut (Easy Heat Vinyl DIY)")
CHECK OUT THESE OTHER FUN T-SHIRT IDEAS USING CRICUT!
How to Make Atom Cats & Fallout Themed Shirts DIY!
Hey Vault Dwellers--Let's make all the Fallout themed shirts for the ultimate in geek chic apparel!
I'm showing how to make 3 shirts: Atom Cats, Vault boy and Vault-Tec--which is your favorite?
The Vault-Tec logo single image shirt is done solely with the Cricut Maker, let me show you how easy it is.
-min.jpg)
How to Make a Reflective High-Vis Running Shirt!
Make the perfect high visibility shirt for outdoor activities in the dark.
Customize it with your favorite silhouette design, using different vinyls is so much fun.
I'm featuring the Fallout Vault-Tec logo on the front and the Vault 76 logo on the back...would you say that it looks radioactive? 😆😆😆
-min.jpg "cricut iron-on, diy shirt making, heat transfer vinyl, custom shirt design, iron-on transfer, personalized shirts, cricut crafting, iron-on projects, shirt vinyl, heat press designs, cricut shirt ideas, vinyl cutting for shirts, iron-on vinyl crafts, custom heat transfers, cricut shirt tutorials, diy heat press, shirt vinyl cutting, iron-on shirt decals, cricut shirt inspiration, heat transfer projects, vinyl shirt decals, cricut heat transfer, diy iron-on transfers, personalized iron-on shirts, heat press vinyl designs, cricut iron-on vinyl, vinyl shirt printing, custom heat press, cricut shirt designs, heat press crafts, shirt making with cricut, iron-on lettering, diy vinyl shirt, cricut vinyl ideas, heat transfer shirt designs, personalized iron-on transfers, cricut iron-on projects, custom vinyl shirts, diy heat transfer vinyl, iron-on vinyl shirt ideas, cricut vinyl crafts, heat press shirt ideas, vinyl shirt making, cricut shirt craft ideas, heat press vinyl crafts, personalized shirt vinyl, cricut shirt customization, diy iron-on shirt designs, vinyl transfer shirts, cricut iron-on tutorials.")
Periodic Table Funny Science T-Shirts with Cricut Maker!
Making funny shirts is one of my favorite hobbies and it's perfect for back to school time.
These two shirts are the perfect match for a science nerd, and are easy to make.
Periodically I'm DyNAmITe...and Expect SArCaSm periodically.
Use the Periodic Table of Elements to spell out words!
Whip out these 2 shirts in a matter of minutes with Cricut Maker and Cricut Design Space.

Pac-Man Ghosts Shirt with Glow in Dark Puff Vinyl!
Pac-Man ghosts shirt!? Yesss!!!
Does it get better than that? Yesss!!!
Glow-in-the-dark...and Puff Heat Transfer Vinyl, all the favorite things!
Learn how to make the perfect Pac-Man Ghost shirt, for comic conventions, the geek in your life or just for a fun shirt to wear during the Autumn time.
This shirt checks all the boxes.
-min.jpg)
FREEDOM Phonetic Alphabet Patriotic Shirt made with Cricut Maker!
Land of the free and the home of the brave! I love Independence day and the Red, White and Blue...I love seeing patriotic Summer time crafts.
This quick shirt is perfect for a last minute patriotic craft!
My husband served in the military and now I understand more what it means to give your all for your country.
I'm thankful for all the brave men and women that defend freedom. Freedom is a power word. Let's make it a shirt!

Weasley Is Our King Shirt with Cricut Iron-on!
Harry Potter crafts are my favorite--I'm such a geek. Weasley is our King! Make a Harry Potter inspired shirt in just a few minutes using a Cricut machine and iron-on vinyl.

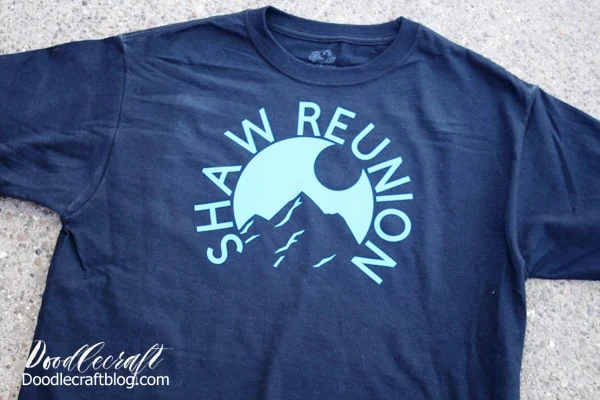
Make a Logo in Cricut Design Space for Family Reunion Shirts!
Are you planning a family reunion this year? Maybe a family vacation somewhere amazing? Design a custom logo in Cricut Design Space for the perfect matching shirts.
Making shirts is undoubtedly my most favorite craft. The good news is it's super fast and so rewarding. Shirts make great last-minute gifts and look very professional. You can create your own custom shirts for any occasion.
Addams Family Movie Song Lyrics Shirt DIY with Cricut
The Addams family is a classic! I grew up watching the black and white Addams family show on TV. I loved the opening theme song and learned to play it on the piano...of course singing along and snapping!

Star Wars Sugar Skull Shirts with Cricut!
The best combination is Star Wars and Halloween!
Make an amazing shirt for any day of the week featuring these fun Sugar Skull designs from Cricut.
These shirts look extra amazing because I used black iron-on vinyl intricate designs on black shirts.
They are subtle but stand-out!

Hood Life Cricut Layered Infusible Ink Shirt DIY
Cricut Infusible Ink is a dream!
I love the way the ink is infused into the shirt, leaving it smooth and flawless.
Learn how to layer multiple colors of Cricut Infusible Ink on a shirt with this tutorial.

1990's "S" Shirt with Freezer paper + Fabric Paint!
Did you grow up in the 90's? If you did, you know this "S", right? I remember sitting outside at recess and drawing this on paper over and over...I must have snuck a notebook and pen out there with me.
I love this S, especially now that my last name starts with an S! This shirt is the perfect conversation piece for everyone that recognizes it, let's make it now!
This shirt is made with Freezer paper and paint and is a great option if you want your image a little distressed.

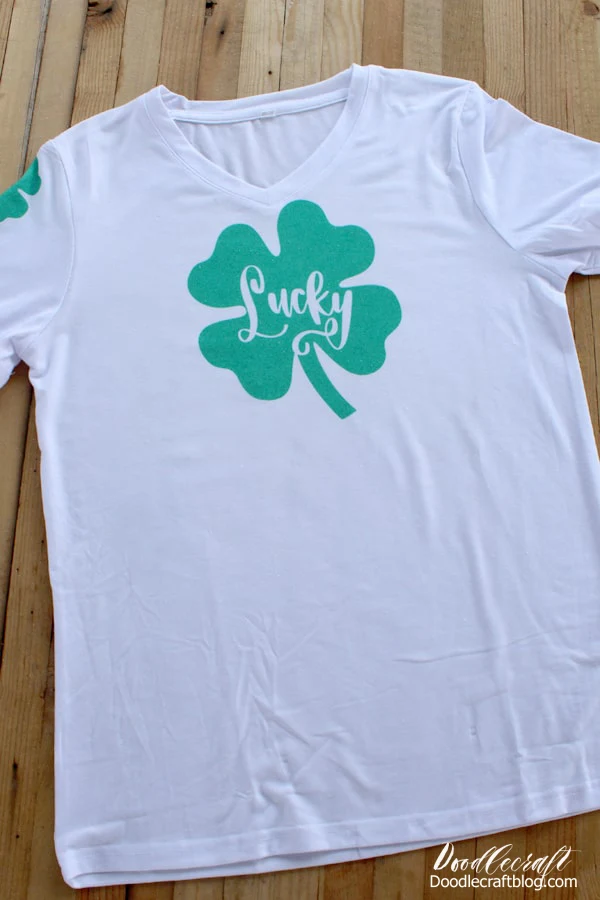
Lucky Clover Cricut Infusible Ink Shirt DIY
Have you tried Cricut's Infusible Ink yet? It's amazing!
The Cricut Infusible Ink Transfers are cut in reverse and pressed onto the shirt, magically infusing the color and design right into the shirt in a smooth transfer.
How to Make Harry Potter Shirts with Cricut!
Make the perfect Harry Potter shirts for any occasion with the Cricut! I love Harry Potter!
I love using my Cricut to create custom shirts, mugs and other items. Customizing things is the best!
It's not always easy to find the exact shirt you have in mind, but if you can make it yourself, it's a win!
The Cricut is my favorite crafting tool and all the different ways to use it.
I love the versatility that it offers and use it all the time.
It is my go-to item for customizing gifts and of course, Harry Potter shirts!

Cricut Infusible Ink Valentine Love Heart Shirt DIY!

How to Make an Iron-on Shirt with Cricut Maker!
Hi friends, if you have been around my blog long, you'll know I love my Cricut Maker and I love making shirts with it. Iron-on shirts are fast and are perfect for family vacations, team shirts, customizing or upcycling shirts in the closet...and great for gifts.
This gold foil vinyl is my favorite type of vinyl!

My Best Friend is Better than yours Shirt DIY with Cricut!
My best friend is better than yours. Isn't this the best shirt?
My most adorable friend had a birthday and I wondered what to give her. Of course a shirt!
So I thought a while about what it should say...and then it came to me. It's like those half heart BFF necklaces from the 80's!
Do you have a bestie that needs this shirt!?
Make the shirt in minutes and give it as a gift with chocolate, of course!

Hibiscus Swim Shirt with SportFlex Iron-on Vinyl with Cricut
Hey Doodlecrafters, I love Hibiscus!
If you've been around here long, then you'd know how much I love this gorgeous tropical flower.
I decided to spruce up an old athletic shirt so I can wear it as a swim cover up.
This hibiscus swim shirt is easy to make in less than 15 minutes!
Stick around--the best part is a huge CRICUT giveaway at the end of this post!

Nintendo Controllers Let's Play Iron-On Vinyl Shirt!
I love Nintendo. Back in 1989 my family got an original Nintendo...and guess what? It still works.
During the mid 1990's when everyone was getting rid of their Nintendo's, my dad bought every single one he could find at thrift stores, all the games too.
Seriously, he ended up with a stack of 9 or 10, and over 100 games.
He gave us one for a wedding gift and we played Nintendo until the console broke...and then we returned it to his stack.
So this year I asked my dad for another original Nintendo, so my kids to play some old school games that I remember. I love Mario Brothers and Legend of Zelda, obviously...but also Mickey Mousecapade and T&C Surf...Contra was another big fave.
What old school games did you love? Click the link to make this and other custom t-shirts.
Star Wars Chewbacca 'Messy Hair Don't Care' DIY Shirt with Cricut
Hey Doodlecrafters, check out this cute shirt!
I'm sharing an especially fun Star Wars themed shirts that take only minutes to DIY!
Cricut has just released Star Wars themed images and they are uniquely awesome!

The Book Was Better Funny Iron-On Vinyl Shirt DIY!
We all have that friend...or maybe we are that friend...you know, the one that loves books!
This is the perfect shirt for your book-loving friend.
I love reading books with my kids before the movies come out so we can compare them.
9 out of 10 times, the book was better.
There's a couple books that I didn't like as much as the movies...like The Princess Bride.
The book just was so hard to get into.
And while I love the Lord of the Rings trilogy, there were a few things that I loved the way they portrayed them in the movies--not the entire movie vs. book though...and definitely not The Hobbit movies!
But basically, as a general rule, the book was better!

Boss Level Shirt with Cricut Iron-on Foil DIY!
Take your conference call Zoom t-shirt up to the next level with the Boss level shirt. It's easy to make high quality shirts using a Cricut cutting machine, heat transfer vinyl and an Easypress. I love making shirts! They are fast and inexpensive for a fun, custom finish!
Lots of us have spent more time at home and indoors during the past year than we'd like to admit. Loungewear is all the rage, it's the new black, it's trending. Make some fun shirts to lounge around in, and yet still assert your dominance.

Make the perfect Harry Potter shirt in minutes! From The Prisoner of Azkaban, Mr. Weasley tells Harry who Sirius Black is and asks Harry not to go looking for him or trouble.
Harry replies with "Trouble usually finds me". Great shirt for Harry Potter parties, themed gifts or for a family vacation to Hogwarts--The Wizarding World at Universal Studios! (read about my trip last year) Start to finish, this shirt only took 10 minutes!
-min.JPG "Trouble Usually Finds Me--Harry Potter Funny DIY Shirt! Make the perfect Harry Potter shirt in minutes! From The Prisoner of Azkaban, Mr. Weasley tells Harry who Sirius Black is and asks Harry not to go looking for him or trouble. Harry replies with \"Trouble usually finds me\". Great shirt for Harry Potter parties, themed gifts or for a family vacation to Hogwarts--The Wizarding World at Universal Studios! (read about my trip last year) Start to finish, this shirt only took 10 minutes!")
Animal Silhouettes with Scripted Power Words!
I love power words and shirt making.
I am in love with my Cricut Maker and use it nearly daily.
Shirts are my favorite craft project.
They are fast to make and totally useful---plus, my dollar store sells lots of tee's, and I am good with that price.
However, I have major issues with a lot of kids shirts these days.
So many of them are sassy, snarky and mean.
I am a fan of building up and lifting, so shirts with powerful animals and strong words are more my style.
Reciting positive things to oneself can have a wonderful impact.
Help children know that they are Strong, Brave, Free, Wild or other different names.
-min.JPG "Animal Silhouettes with Scripted Power Words! I love power words and shirt making. I am in love with my Cricut Maker and use it nearly daily. Shirts are my favorite craft project. They are fast to make and totally useful---plus, my dollar store sells lots of tee's, and I am good with that price. However, I have major issues with a lot of kids shirts these days. So many of them are sassy, snarky and mean. I am a fan of building up and lifting, so shirts with powerful animals and strong words are more my style. Reciting positive things to oneself can have a wonderful impact. Help children know that they are Strong, Brave, Free, Wild and more.")
Buffalo Plaid Heart HTV Shirt with Cricut Explore Air 2!
Buffalo plaid is all the rage. It's so fun and so in--and now you can make it with 2 layers of iron-on vinyl.
If you have a Cricut Explore Air™ 2 machine, you can make this buffalo plaid heart shirt in mere minutes.
-min.JPG "Buffalo Plaid Heart HTV Shirt with Cricut Explore Air 2! Buffalo plaid is all the rage. It's so fun and so in--and now you can make it with 2 layers of iron-on vinyl. If you have a Cricut Explore Air™ 2 machine, you can make this buffalo plaid heart shirt in mere minutes.")


-min.jpg)


Comments