
-min.JPG)
How to Tie Dye Tote Bags (DIY Tie-Dye Canvas Bag)!
Learn how to tie dye high-quality colorful canvas tote bag.
It is super fun and easy it is to tie dye tote bags!
All you need is 100% cotton tote bags and Tulip Tie Dye Party Kit and you are ready to go!
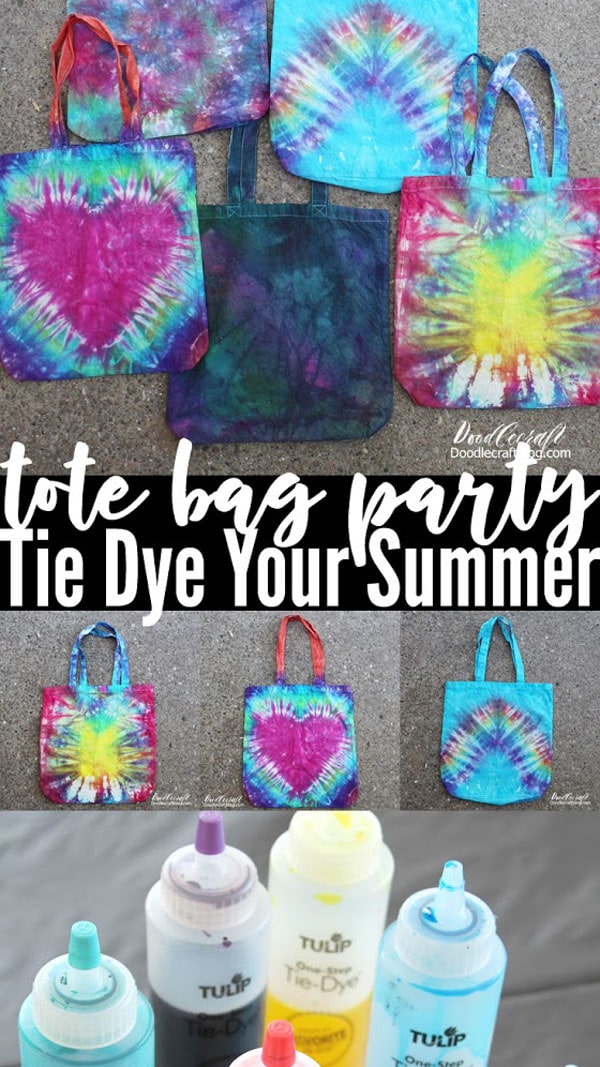
Inviting friends over to tie dye is a fun summer tradition for us...if you haven't had the chance, try it!
Tie Dying is random and spontaneous, creating awesome or subtle gradations!
It is so fun to see the reveal of how the project turns out and is a great way to make custom bags for an event, a trip to a sandy beach, sports event, party favors or just a fun bag with a splash of color!
-min.JPG)
Supplies Needed for Tie Dye Tote Bags:
- Tulip One-Step Dye Party Kit (Tie-dye kits are the way to go)
- 100% Cotton Totes (ShirtSpace is the best place for blanks!)
- Washable marker
- Zip ties
- Disposable work surface
- Wire drying rack (thrift stores are perfect for this)
- Plastic grocery bags
- Basin of water (warm, not cold water)
-min.JPG)
Step 1: Prep the Fabric Dye
Fill the Tulip One Step Tie Dye bottles according to the package directions.
I have only used Tulip One Step Tie Dyes, so I cannot vouch for or recommend any other dyes.
Fill the plastic squeeze bottles to the fill line and shake up the dye with the cap on.
Cover the table with a disposable work surface.
Set the baking rack on the table.
Have gloves out and ready to go.
-min.JPG)
Step 2: Get Started
Soak the new tote bag in a basin of warm water.
This will prep the bag and help the it absorb the dye.
-min.JPG)
Step 3: Tie Dye
Lay the bag on the table to plan out the tie dying design.
Use a marker to draw the pattern or just twist and tie up with elastics, rubber bands or zip ties.
Check out the video for sped up tie-dye bags full tutorial!
Let's make a Rainbow Tie Dye Tote!
Fold in half and draw half a rainbow on the bag with the marker, the highest part on the folded line.
-min.JPG)
Gather the bag along the line and tie a zip tie tightly over the marker line.
Then add zip ties down the bag.
-min.JPG)
Until you have tied on 8 (or so) zip ties.
-min.JPG)
Place the bag on the baking rack.
How to Tie Dye:
The process of tie dying is easy if you have everything ready to work with.
Wear gloves and have the tie dye bottles all filled up and ready to use.
Fill the top zip-tied open space with red dye, move onto orange and yellow...and so on through all the colors of dye.
-min.JPG)
Continue with the rest of the rainbow.
-min.JPG)
Add blue dye to the top and the bottom of the bag.
Then turn over and fill the other side with the same colors.
The excess dye drips off the baking sheet onto the disposable table cover, making clean up easy and keeping the dye colors from puddling, mixing together and turning the backside of the custom totes from turning muddy.
-min.JPG)
Place in a plastic grocery bag and let it sit in the sun for 8 hours.
Then wash it out in the sink, clip the zip ties off and continue washing until the water runs clear.
Then immediately wash in the washing machine, dry it and enjoy!
-min.JPG)
Now let's make a Heart Bag!
For the 2nd tote, let's do a big tie-dye heart in the center.
Fold the bag in half and draw a half heart on the bag, with the points on the folded edge.
-min.JPG)
Gather the marker line so it makes a straight line and tie it off with a zip tie.
Then add zip ties up the rest of the bag...just like the rainbow bag.
-min.JPG)
Place on the baking rack and add colors.
The red one is the heart shape.
Turn over and repeat the colors on the backside.
Place in a plastic grocery bag and let it sit in the sun for 8 hours.
Then clip off the zip ties and rinse in the sink until the water runs clear.
-min.JPG)
Put it in the washing machine and wash it like a normal load.
I washed all the totes together after I rinsed them.
This tie dyed heart tote is so cute!
-min.JPG)
Let's make a Galaxy Tote!
Wet the bag and place on the table.
No need for the rack.
-min.JPG)
Fill the bag with bright, vibrant dyes.
-min.JPG)
Add splashes, swirls and dyes of every color.
-min.JPG)
It's awesome just like this but will have lesser value of color tones after it is washed out.
-min.JPG)
Or turn it into a galaxy by adding black!
-min.JPG)
Set in the sun in a plastic bag, rinse thoroughly, wash and dry!
The vibrancy has dimmed, but it's still a great galactic bag!
Just add planets and stars with paint or iron on vinyl.
-min.JPG)
Traditional Tie Dye Twist:
Twist the wet tote bag and wrap it in rubber bands.
Add all kinds of tie dye colors.
Then let the tote sit in a plastic bag 4-6 hours before rinsing out and washing.
-min.JPG)
Let your tie dye party friends experiment and they will come up with clever and unique ideas!
Like this tie dye pineapple tote bag!
Get creative by creating one of a kind limited edition totes!
These totes are great for daily use, groceries, library book bags and fun for Summer camp daily activities too--great for years of usage!
-min.JPG)
These cotton tie dye totes are perfect for shopping, weekends at grandma's, the farmer's market, a Summer camp crafts and more!
I love the rugged handles...any 100% cotton bag will work, even a family-sized carryall.
Make a thoughtful handmade gift with matching gift sets of tie dyed tote bags.
-min.JPG)
That's it!
Make the perfect tie dye totes using Tulip One Step Dyes!
These tote bags are easy to make and customize and are so much fun!
They are a great birthday party craft where you can give back totes when they are finished to the party guests as a "thank you".
Such a great bag to add to the accessory collection--you will love making creative tie-dyed tote bags.
Like, Pin and Share!
Check out my other Tie Dye posts for more Summer time inspiration too!
Captain America Tie Dye Shirt
Make a Captain America shield Tie Dye shirt using the target pattern tie dye technique in red, white and blue and then add a star with pattern vinyl or freezer paper and paint!

Tie Dye Party!
Here's where the patriotic tie dye (1) appeared for the first time!
Plus all the tips and tricks for hosting a tie dye party with lots of guests.
If you are working with a group, have everyone outdoors line up until it's their turn at the tie dye table, and only work 2 shirts at a time.
Everyone else in the yard rolls around, plays in sprinklers, or some other activity so they aren't dying of anticipation--or heat just waiting.

Halloween themed Tie Dye!
Make fun and spooky themed tie dye shirts with sugar skulls, pumpkins, eyeballs, skulls and bats!
If you can tie it, you can dye it!

Galaxy Scarf!
Use the reverse tie dye technique using black fabric and bleach!
Then add in all the colors of the galaxy and paint on the planets too!

Galaxy Dress!
Find an old dress in need of an upcycle...make sure it's black and mostly cotton!
Then use bleach to lighten it in places and then add tie dye to give it galactic colors!
Add planets with paint or heat transfer vinyl.

Bleach Resist Tie Dye Galaxy!
More bleaching tie dye, but this time with an image to resist and leave behind bold black!

Mermaid Scale Tie Dye Shirt
Using glue to draw the fish scales on a cotton shirt and then adding the tie dye colors worthy of a sea creature to make the perfect summertime shirt!

Rainbow Tie Dye Shirt

Tie Dye Galaxy Shoes
Get some white shoes and turn them into the best shoes in the galaxy with a little tie dye!

I heart heart The Doctor!
Make a double heart tie dye shirt, perfect for a sugar skull...or for Doctor Who's double heart.
This fun shirt is perfect!
Tie Dye Pajama Party
Host a fun party with friends and everyone gets pairs of jammies!
In this case, oversized shirts.
We started these early in the morning and washed them out right in time to have them dry for bed...hence the dark picture!

Patriotic Stripes Tie Dye Shirt!

Hibiscus Tea Dyed Face Masks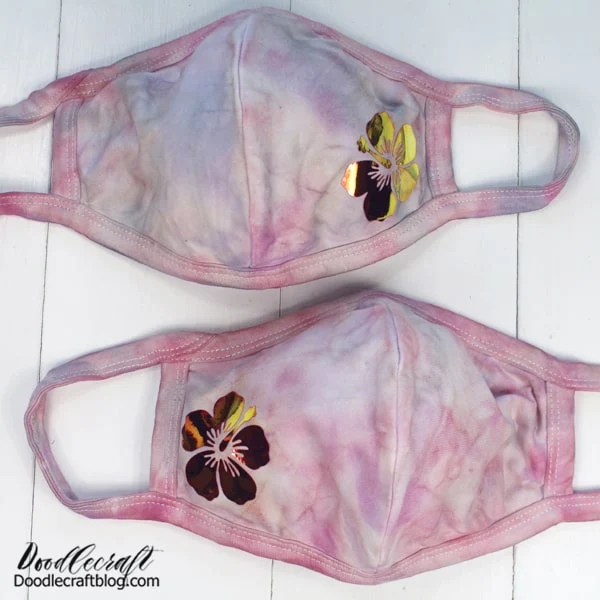


-min.jpg)


Comments