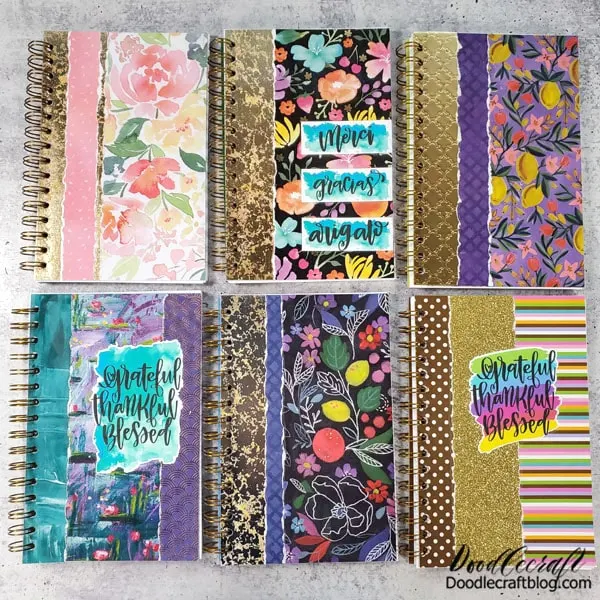
Gratitude Journals: We R Memory Keepers Cinch Binding Tool


This post may contain affiliate links, sponsored content and products received at no cost.
6:00 AM
Gratitude Journals: We R Memory Keepers Cinch Binding Tool  Learn how to make these paper pieced gratitude journals using the We R Memory Keepers Cinch Binding tool.    Keeping track of special moments, things that worked out and little tender mercies is such a good way to focus on the positive parts of life rather than the dreary.

Gratitude Journals: We R Memory Keepers Cinch Binding Tool


Learn how to make these paper pieced gratitude journals using the We R Memory Keepers Cinch Binding tool. 


Keeping track of special moments, things that worked out and little tender mercies is such a good way to focus on the positive parts of life rather than the dreary.


Gratitude Journals: We R Memory Keepers Cinch Binding Tool  Learn how to make these paper pieced gratitude journals using the We R Memory Keepers Cinch Binding tool.    Keeping track of special moments, things that worked out and little tender mercies is such a good way to focus on the positive parts of life rather than the dreary.

This is one of my favorite crafts, these notebooks are easy to make and make a great handmade gift.


We had a church activity with about 20 ladies and we made gratitude journals. They were a big hit--and everyone wanted to make more than one!


This is one of my favorite crafts, these notebooks are easy to make and make a great handmade gift.   We had a church activity with about 20 ladies and we made gratitude journals. They were a big hit--and everyone wanted to make more than one!

Supplies Needed for Gratitude Journals:


Cinch Wires (I get mine in bulk here--you need 2:1 pitch, 3/4")
Scrapbook Paper
Tape Runner Gun or Glue Stick
Stickers (made with my Cricut)
Wire Cutters


Supplies Needed for Gratitude Journals:  We R Memory Keepers Cinch Binding Tool Cinch Wires (I get mine in bulk here) Scrapbook Paper Cardstock Paper (Mine is from Cardstock Warehouse) Laminator and Plastic Sleeves Tape Runner Gun or Glue Stick Stickers (made with my Cricut) Ream of White Paper  Paper Cutter Wire Cutters

Step 1: Scrapbook Paper Piecing


Begin by cutting a sheet of cardstock in half so you have 2 pieces that measure 5.5 x 8.5 inches.


Step 1: Scrapbook Paper Piecing  Begin by cutting a sheet of cardstock in half so you have 2 pieces that measure 5.5 x 8.5 inches.

Then cut scrapbook paper to fit, cover and fill the cardstock.


Then cut scrapbook paper to fit, cover and fill the cardstock.

This paper can be ripped, overlapped and pieced together to create the perfect front and back covers.


This paper can be ripped, overlapped and pieced together to create the perfect front and back covers.

Use a tape runner to very heavily tape all the pieces together. If they are not super secure, right to the edges, the book cover will lift apart.


Use a tape runner to very heavily tape all the pieces together. If they are not super secure, right to the edges, the book cover will lift apart.

Step 2: Stickers!


I designed some gratitude stickers with my hand lettering and watercolor washes and used Cricut Design Space to do the Print and Cut option.


Here's the Cricut Design Space Project link if you are interested!


Step 2: Stickers!   I designed some gratitude stickers with my hand lettering and watercolor washes and used Cricut Design Space to do the Print and Cut option.    Here's the Cricut Design Space Project link if you are interested!

Then these labels were easy for the other ladies to just stick them on their covers if they wanted to.


Then these labels were easy for the other ladies to just stick them on their covers if they wanted to.

Step 3: Laminate!


Now that the front and back covers are paper pieced, taped and stickered, laminate them.


The front and back cover can both fit in one page size plastic sleeve. The lamination does not need to be absolutely sealed on all the edges, because we cut it right to the edge anyway.


Step 3: Laminate!  Now that the front and back covers are paper pieced, taped and stickered, laminate them.   The front and back cover can both fit in one page size plastic sleeve. The lamination does not need to be absolutely sealed on all the edges, because we cut it right to the edge anyway.

Step 4: Cut!


Now use scissors to cut the lamination on the book covers all the way to the edge of the paper. 


If there remains an edge of plastic, it will not fit in the book binding Cinch properly and cause mislined holes.


Step 4: Cut!  Now use scissors to cut the lamination on the book covers all the way to the edge of the paper.     If there remains an edge of plastic, it will not fit in the book binding Cinch properly and cause mislined holes.

Step 5: Binding!


Now comes the time to use the We R Memory Keepers Cinch.


This binding machine is awesome--it does everything!


Begin by cutting a stack of white paper in half with the paper cutter. Cut until you have a thick stack of paper the size you want your notebook to be.


I used about 40-50 half pages for each notebook.


Then slide them into the Cinch and punch holes down one side. 


The size of the paper requires 2 punches, I do all the full punches on all the paper before moving to the remainder of the holes.


Step 5: Binding!  Now comes the time to use the We R Memory Keepers Cinch.   This binding machine is awesome--it does everything!   Begin by cutting a stack of white paper in half with the paper cutter. Cut until you have a thick stack of paper the size you want your notebook to be.    I used about 40-50 half pages for each notebook.    Then slide them into the Cinch and punch holes down one side.     The size of the paper requires 2 punches, I do all the full punches on all the paper before moving to the remainder of the holes.

Then punch holes on the edge of the book covers.


Then punch holes on the edge of the book covers.

Use wire cutters to clip the wire so you have the correct number of hooks for holes.


Hang the wire on the edge of the Cinch and place the back cover of the book on the wires, with the scrapbook finished cover showing.


Use wire cutters to clip the wire so you have the correct number of hooks for holes.   Hang the wire on the edge of the Cinch and place the back cover of the book on the wires, with the scrapbook finished cover showing.

Then place the front cover of the book on the wires with the scrapbooked finished side facing down.


Then place the front cover of the book on the wires with the scrapbooked finished side facing down.

Then stack the pile of paper on the wires on top of the book cover pages.


Then stack the pile of paper on the wires on top of the book cover pages.

Then remove the wire and pages from the edge and move to the back of the Cinch tool.


Place the wires right up to the backside of the press.


Then remove the wire and pages from the edge and move to the back of the Cinch tool.   Place the wires right up to the backside of the press.

Press gently down on one side of the wires and then slide the wires over and press them gently down. 


Once the wires are slightly pressed, press them down completely until all the wires are pressed and curled into place.


Press gently down on one side of the wires and then slide the wires over and press them gently down.    Once the wires are slightly pressed, press them down completely until all the wires are pressed and curled into place.

That's it! It's a "cinch" to make these notebooks and they turn out so cute!


These make great handmade gifts for teachers, friends and neighbors. 


They are perfect for keeping track of blessings throughout the new year.


That's it! It's a "cinch" to make these notebooks and they turn out so cute!   These make great handmade gifts for teachers, friends and neighbors.     They are perfect for keeping track of blessings throughout the new year.

I love having the Cinch Binding Tool. I don't use it every day, but when I used it--I make 50 of them in a weekend!


I love having the Cinch Binding Tool. I don't use it every day, but when I used it--I make 50 of them in a weekend!

That's it!

Get yourself a We R Memory Keepers Cinch Binding Tool and some 2:1 pitch wires!


Like, Pin and Share!


Gratitude Journals: We R Memory Keepers Cinch Binding Tool  Learn how to make these paper pieced gratitude journals using the We R Memory Keepers Cinch Binding tool.    Keeping track of special moments, things that worked out and little tender mercies is such a good way to focus on the positive parts of life rather than the dreary.


Here's some more fun Cinch Book ideas!


I love making handmade gifts for the holidays and The Cinch Binding Tool is the perfect way! I'll show you how to make your own notebooks for a great handmade gift, stocking stuffer, planner for the new year, or just because! Make a wire bound notebook in just a few minutes.


Take some old cereal boxes and make the perfect notebooks using the Cinch binding tool.


How to make a character notebook for keeping track of fantasy or book characters


Make wire bound sketchbooks or note books using the We r memory keepers binding machine cinch.


facebook Follow Me on Pinterest Youtube Instagram twitter
postscript

Comments