Harry Potter Gifts Made with Cricut!


This post may contain affiliate links, sponsored content and products received at no cost.
6:00 AM
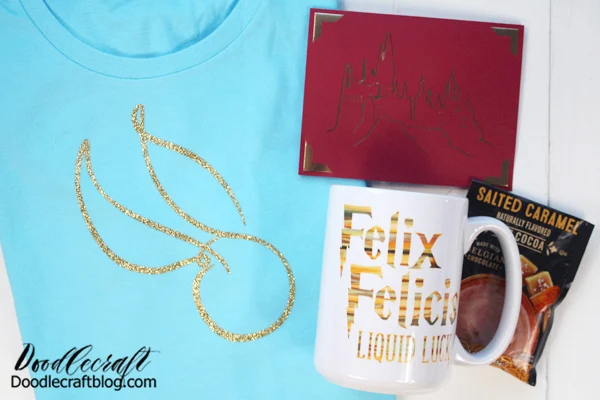
I love making handmade gifts for the holidays! I especially love to create gifts that just fit a persons fandom. If you have a friend, family member or teacher that loves Harry Potter, here's the perfect gift basket.

Harry Potter Gifts Made with Cricut!

I love making handmade gifts for the holidays! I especially love to create gifts that just fit a persons fandom. If you have a friend, family member or teacher that loves Harry Potter, here's the perfect gift basket.

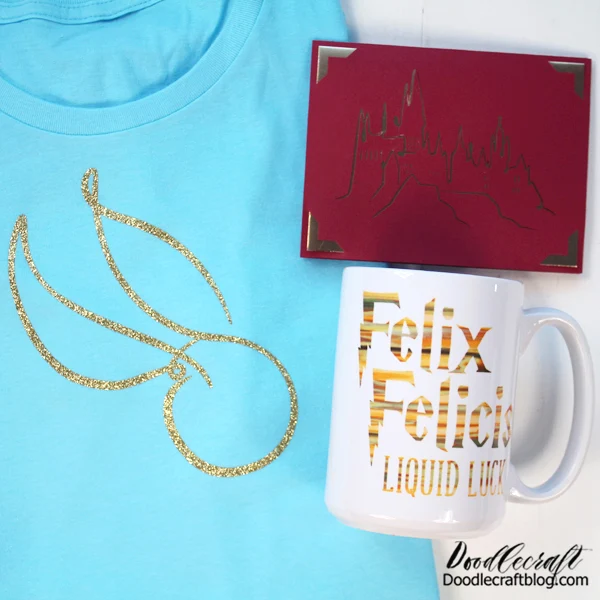
Make a custom shirt with a golden snitch, a handmade card featuring Hogwarts Castle and the best part, a Felix Felicis Liquid Luck Mug! Just add a little package of hot chocolate for the finishing touch.

Make a custom shirt with a golden snitch, a handmade card featuring Hogwarts Castle and the best part, a Felix Felicis Liquid Luck Mug! Just add a little package of hot chocolate for the finishing touch.

If you have a Cricut Machine, you have a world of possibilities at your fingertips! I love my Cricut Maker and use it nearly every single day. Customize everything, make handmade gifts, cut paper, etch acrylic, create stencils, engrave, cut chipboard and bass wood! 

So many options. Plus, here's some great posts I wrote up about turning your Cricut into a money making side hustle:

If you have a Cricut Machine, you have a world of possibilities at your fingertips! I love my Cricut Maker and use it nearly every single day. Customize everything, make handmade gifts, cut paper, etch acrylic, create stencils, engrave, cut chipboard and bass wood!   So many options. Plus, here's some great posts I wrote up about turning your Cricut into a money making side hustle: Make Money with a Cricut Machine 100 Cricut Projects to Sell How to Start a Cricut Business

Gift #1: Felix Felicis Liquid Luck Mug

Supplies Needed:


Gift #1: Felix Felicis Liquid Luck Mug Supplies Needed: Sublimation Mug Cricut Infusible Ink Silicone Mug Wrap Cricut Brayer Cricut Cutting Machine/mat Cricut Heat Resistant Tape Oven

Step 1: Cutting Infusible Ink

Begin by uploading the png file below (right click to save off) to Cricut Design Space. Then scale it to the right size for your mug. I did 3 inches wide. Then cut 2 out of the Infusible Ink Transfer of your choice.

Step 1: Cutting Infusible Ink Begin by uploading the png file below (right click to save off) to Cricut Design Space. Then scale it to the right size for your mug. I did 3 inches wide. Then cut 2 out of the Infusible Ink Transfer of your choice.

Sublimation mugs are specially coated so that the ink will seamlessly transfer. The ones I'm using are 15 ounces and have an oversized handle, which I love.

Step 2: Weed Infusible Ink

Now weed the negative space of the Infusible Ink. Don't use the standard Cricut hook tool. Instead, peel it off like a paper sticker. Don't over touch the transfer or it will mess up the ink.

Step 2: Weed Infusible Ink Now weed the negative space of the Infusible Ink. Don't use the standard Cricut hook tool. Instead, peel it off like a paper sticker. Don't over touch the transfer or it will mess up the ink.

Step 3: Place on Mug

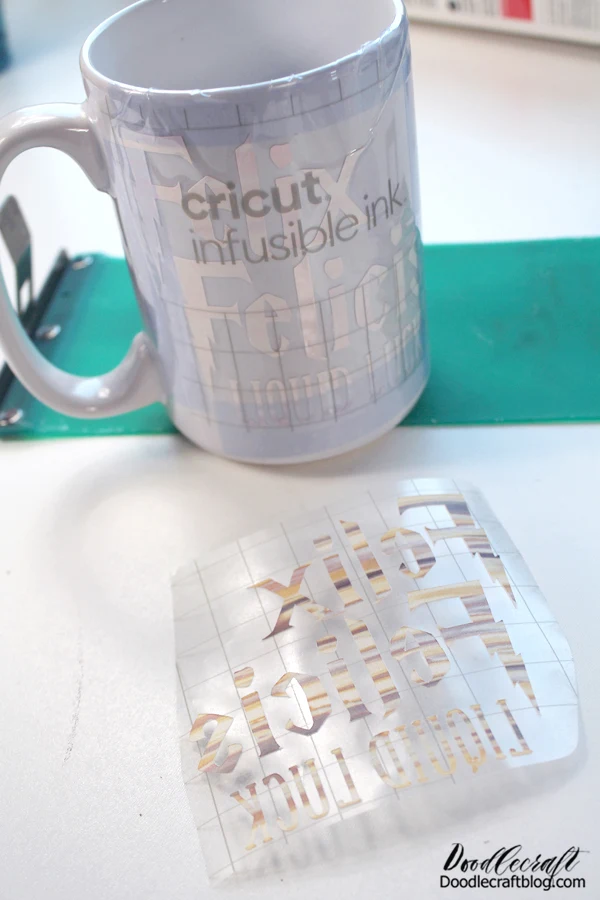
Use the heat resistant tape to adhere the transfer in place. It can be a little tricky to line up the words straight. I always do 2 images, so I can put them on both sides of the mug...I want both sides to be cute!

Step 3: Place on Mug Use the heat resistant tape to adhere the transfer in place. It can be a little tricky to line up the words straight. I always do 2 images, so I can put them on both sides of the mug...I want both sides to be cute!

Repeat for the other side.

Step 3: Place on Mug Use the heat resistant tape to adhere the transfer in place. It can be a little tricky to line up the words straight. I always do 2 images, so I can put them on both sides of the mug...I want both sides to be cute!

Then click the silicone wrap around the mug. This holds it all in place while the heating happens...the transfer paper from the infusible ink transfers is not enough. You can likely just use the heat resist tape...or just the wrap...but I've been using both because I have both. 

Then bake in the oven at 400* for 15 minutes. Remove from the oven and pop off the silicone wrap...it's hot! Then let it cool down for about 20 minutes and then remove the heat tape and the transfer. It should have transferred the ink perfectly.


Then click the silicone wrap around the mug. This holds it all in place while the heating happens...the transfer paper from the infusible ink transfers is not enough. You can likely just use the heat resist tape...or just the wrap...but I've been using both because I have both.   Then bake in the oven at 400* for 15 minutes. Remove from the oven and pop off the silicone wrap...it's hot! Then let it cool down for about 20 minutes and then remove the heat tape and the transfer. It should have transferred the ink perfectly.

The mug all on it's own is a great handmade gift! But let's really go over the top--next up, a Golden Snitch Shirt!

The mug all on it's own is a great handmade gift! But let's really go over the top--next up, a Golden Snitch Shirt!

Gift #2: Golden Snitch Shirt

Supplies Needed:

Hook Tool
T-Shirt (Got this one at the Dollar Tree)

I bought a whole bunch of Harry Potter images on Cricut Design Space. They are licensed, so they don't come with Cricut Access. I love these whispy looking ones. I used the Golden Snitch and Hogwarts Castle on the card.

Gift #2: Golden Snitch Shirt Supplies Needed: Cricut Machine Gold Iron On Vinyl Hook Tool EasyPress 2 T-Shirt (Got this one at the Dollar Tree)  I bought a whole bunch of Harry Potter images on Cricut Design Space. They are licensed, so they don't come with Cricut Access. I love these whispy looking ones. I used the Golden Snitch and Hogwarts Castle on the card.

Step 1: Cut Iron-on

Begin by cutting the iron-on vinyl in reverse (mirror).

Step 2: Weed the Vinyl

Remove the excess iron-on vinyl from the image.

Step 3: Heat Press

Now place the shirt on the EasyPress mat and the iron-on on the shirt. Then press with the EasyPress 2 for the recommended time. 

Step 4: Cool Peel

Then wait until the shirt cools down. After it's cooled, peel off the plastic transfer sheet. Done!

Step 1: Cut Iron-on Begin by cutting the iron-on vinyl in reverse (mirror). Step 2: Weed the Vinyl Remove the excess iron-on vinyl from the image. Step 3: Heat Press Now place the shirt on the EasyPress mat and the iron-on on the shirt. Then press with the EasyPress 2 for the recommended time.  Step 4: Cool Peel Then wait until the shirt cools down. After it's cooled, peel off the plastic transfer sheet. Done!

So far, so good! Two fantastic handmade gifts ready for the Harry Potter fan in your life! Let's finish it off with a great handmade card.

So far, so good! Two fantastic handmade gifts ready for the Harry Potter fan in your life! Let's finish it off with a great handmade card.

Gift #3: Handmade Card

Supplies Needed:

Cardstock
Gold Metallic Posterboard (again Dollar Tree)
Cricut Design Space

Gift #3: Handmade Card Supplies Needed: Cardstock Gold Metallic Posterboard (again Dollar Tree) Cricut Machine Cricut Design Space

Okay, I don't have a lot of pictures for this process. Here's what I did. Just open up Cricut Design Space. Create a new canvas and then select the images tab. 

Step 1:

Search 'insert cards'.

Step 2:

Find an insert card that is blank that you like the corners of.

Step 3:

Insert Hogwarts Castle.

Step 4:

Attach the insert card and castle file, so it cuts it all out at once.

Step 5: 

Insert paper on the mat. Add your scoring wheel or stylus in the machine. The machine will score the card center line first.

Step 6:

Switch to the Cutting Blade and click go. Then the machine will cut out the notches and design.

Step 7:

Carefully remove card and insert metallic card cut to the proper size.


Okay, I don't have a lot of pictures for this process. Here's what I did. Just open up Cricut Design Space. Create a new canvas and then select the images tab.  Step 1: Search 'insert cards'. Step 2: Find an insert card that is blank that you like the corners of. Step 3: Insert Hogwarts Castle. Step 4: Attach the insert card and castle file, so it cuts it all out at once. Step 5:  Insert paper on the mat. Add your scoring wheel or stylus in the machine. The machine will score the card center line first. Step 6: Switch to the Cutting Blade and click go. Then the machine will cut out the notches and design. Step 7: Carefully remove card and insert metallic card cut to the proper size.

Phew, it sounds like I way overcomplicated this card making, but it's not hard at all. Check out this post on a handmade gift for a Mandalorian/Baby Yoda fan too!

Phew, it sounds like I way overcomplicated this card making, but it's not hard at all. Check out this post on a handmade gift for a Mandalorian/Baby Yoda fan too!

That's it! Three fabulous handmade gifts made with the Cricut! Which gift is your favorite? I love the mug! I'm so obsessed with mugs these days.

Any Harry Potter fan would love this thoughtful gift basket! Just add some hot drink mixes and you have the perfect Christmas present.

That's it! Three fabulous handmade gifts made with the Cricut! Which gift is your favorite? I love the mug! I'm so obsessed with mugs these days.  Any Harry Potter fan would love this thoughtful gift basket! Just add some hot drink mixes and you have the perfect Christmas present.

Like, Pin and Share!


I love making handmade gifts for the holidays! I especially love to create gifts that just fit a persons fandom. If you have a friend, family member or teacher that loves Harry Potter, here's the perfect gift basket.  Make a custom shirt with a golden snitch, a handmade card featuring Hogwarts Castle and the best part, a Felix Felicis Liquid Luck Mug! Just add a little package of hot chocolate for the finishing touch.


facebook Follow Me on Pinterest Youtube Instagram twitter
postscript

Comments