

How to Host a Tie Dye Shirt Party (Supplies & Ideas)
Tie Dye is the first signs of Summertime and a tie-dye party is the best way to celebrate!
The bright colors and hippy look are perfect for Summer barbecue's, parades, Summer camp and Family reunions.
Learn everything you need to know about tie dying shirts so you are ready to host a fabulous tie dye event!
 Tie Dye is the first signs of Summertime and a tie-dye party is the best way to celebrate! The bright colors and hippy look are perfect for Summer barbecue's, parades, Summer camp and Family reunions. Learn everything you need to know about tie dying shirts so you are ready to host a fabulous tie dye event!")
Tulip Tie-Dye Kits:
Tulip tie dye is the best dye! It's one step process makes it so easy to use with the wet technique!
Dyes are permanent and color-fast...so if applied properly, they wont fade in the wash!
Tulip tie dye kit or individual dye bottles are perfect for a family activity or full blown tie dye birthday party.
I have only ever used Tulip One Step Dyes with 100% cotton shirts.
If you use other products, they might not turn out the same.

BRIEF HISTORY OF TIE DYE:
Tie-dye, originating in ancient Asia, gained prominence in India as "Bandhani" around the 6th century. Traversing trade routes, it influenced African and Middle Eastern cultures.
In the 1960s, tie-dye became emblematic of the counterculture, symbolizing freedom and rejecting societal norms--apart from being so much fun.
Popularized by iconic figures like Janis Joplin, it experienced a mainstream revival in the 1980s and a grunge resurgence in the 1990s.
Today, tie-dye seamlessly blends ancient traditions with contemporary fashion, with designers incorporating its vibrant patterns into haute couture, ensuring its enduring presence in the ever-evolving landscape of self-expression and style.

Products received at no cost from Tulip and Gilden for this post!
Huge packs of tie dye and 20 t-shirts!
Supplies Needed for Tie Dye Party:
- Tulip One-Step dyes
- 100% Cotton T-shirts in white, bandannas, socks, etc. (prewash fabric)
- Warm water
- Cookie Rack
- Plastic trash bag
- Washable Markers
- Zip Ties
- Disposable Gloves (some are included in the tie-dye kit but you may need a few pairs of gloves)
- Disposable Plastic Table Cover
- Reusable Plastic Storage Bin
- Paper Towels
Here's my favorite dyes in various party sizes:
(they sell out FAST in the Summer time!)

Would you believe that I have never tie dyed before?
Raise your hand if you have NEVER tie dyed before...it's time to try it!
You'll want to set up the perfect Tie Dye Station to make the party flow smooth.

This was my first go at it...and you know what?
I love it and I am completely obsessed.
Just watch out...anything and everything that is white is soon to be tie dyed!
Tie dying is a fun family activity! Great for all ages too.
Some set up in advance, and even the littlest toddler could make their own shirt!

Tie-Dye Station Set Up:
- Begin with a disposable plastic tablecloth to cover the table.
- Work outside on a nice, hot day.
- Set tulip color dyes on the table.
- Have a pitcher of hot water and a basin of warm water.
- Set the baking cooling rack on the plastic surface cover.

Overview for Tie Dying Shirts:
Begin by dipping the shirt in warm water and ringing it out.
Then fold, twist or gather the shirt together.
Tie it off with elastics or zip ties.
Then add the dye (mixed according to package directions).
My 5 year old son is always super reluctant to do any type of "craft" but even he loved this.

He was hesitant to come and make a shirt...but he did a camouflage one and loved it!
It was his idea to make it army colors!
This post has been updated since 2015...this guy is now nearly 16!

I think he did great!
I love how it looks almost camouflage!

We live far away from extended family. This would be the funnest family reunion activity!
So I invited over a bunch of other families--about 25 party guests to come tie dye with us!
It's a great way to have neighbors over.
How to host a Tie Dye Party:
I had enough dye rated for "65 projects".
Because we did large child and large adult shirts it ended up making 40 shirts total.
(hopefully this helps when you are planning ahead for your party!)

5 Tips for Tie Dye Party:
- Wrap the table with garbage bags or a plastic table cloth, so the clean up is easy.
- Have a basket of pre-washed and wet 100% cotton white t-shirts.
- Use baking cookie racks to keep the dye from pooling under the shirts.
- Washable markers are great for tracing out shapes or patterns to follow.
- Have a large supply of disposable gloves and plastic grocery bags for wrapping later.
- Crowd Control. We have a swimming pool...so we only had a couple kids make shirts at a time while other activities were going on.
This crowd control is essential--especially if doing this for summer camps or other private events.

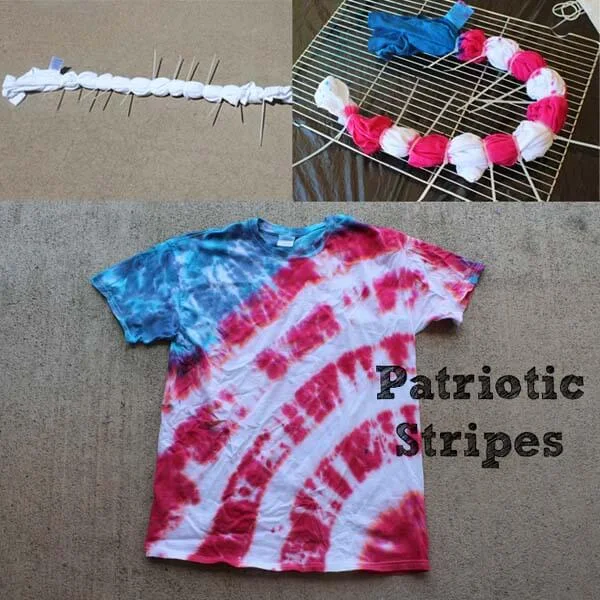
How to Tie Dye a Rainbow Shirt:
Step 1: Draw
Let's start with a rainbow!
Draw a curved line on the shirt with a washable marker in an arch line across the shirt.

Step 2: Gathering
Next, while wearing gloves, gather the shirt along that line so the blue marker line matches up in a straight line.

Step 3: Zip Ties
Then use a zip tie to tie off that blue marker line.
This gathering will make the arch on the shirt, just like the marker line drawn on earlier.

Now, simply add zip ties down the shirt, keeping the gathering the same as the first time to create all the rows of the colorful rainbow.

Until you have enough for the colors you want!

Place the gathered and zip-tied (or elastic) damp fabric shirt on top of your baking rack.

Step 4: Tie Dye
Use the dye according to directions.
The dye is already in the bottle, so no need to measure out the amount of dye.
Just fill the dye colors with hot water from the pitcher up to the marked line on the dye bottle.
Shake the dye into the water for a minute, covering the end of the bottle.
Repeat the dye prep for each of the bottles of dye.
Then gently squeeze the mixed dye colors you want on the shirt.
There will most likely be some bleeding and it will leak through the baking rack onto the cover work surface.
This will prevent muddy mixing of dye colors on the backside of the shirt.

I added 2 shades of blue sky--leaving some white spots as clouds.
Then turn the shirt over on the baking rack and dye the backside of fabric item or shirt with the same colors.

See how excess dye can just pool up on the plastic table instead of turning your shirt into a muddy mess?...yes, do this!
After finishing a shirt, clean off the work area with a paper towel and then set up for the next shirt.

Step 5: Wrap in Plastic
Next, take the shirt and wrap it in plastic.
I used plastic wrap first and then placed it in its own plastic bag.
This keeps the dyes from touching and bleeding together.

You need to make sure the shirt isn't overlapping other colors or they will bleed together still.
I overlapped the blues...no big deal. Then I put it in a grocery bag and set it in the sunshine.

Step 6: Wait 8 Hours
Wrap it carefully and let it sit for 6-8 hours.
We waited overnight.
At this point of the party, everyone took their tie-dye t-shirt bags home and finished them off on their own after waiting the correct amount of time.
If you are at a Summer camp, this works great to do the next day and then everyone can wear their shirts together and have some photo booth fun!

Step 7: Wash
Take it out of the wrapping...and rinse in the sink. I rinsed a few minutes...then remove the zip ties carefully with scissors.
Then continue to rinse in the hottest water until the water runs clear.
This is the BEST part! You finally get to see how your shirt turned out!
(Note: the shirt in the sink is not the rainbow shirt...but you get the idea)

Then throw it in the washing machine and run a large load setting cycle.
Use a small amount of laundry soap and follow the care instructions for the dyed shirt.
It will fade out a little to a lighter shade of color...but as long as you use 100% cotton shirts, you'll end up with this awesome tie-dye t-shirt!
Then toss into the dryer with a dryer sheet (optional) until it is dry fabric.
It's a noticeably weaker color intensity, but still vibrant and intense colors.

That's it!
Tie-dye shirts was a super fun activity for all ages!
This would be great for summer camp shirts...girls camp, family reunions, a baby showers...birthday parties--you name it!

And we used lots of dye!
All in all, we ended up making about 40 shirts--maybe just the equivalent of one extra bottle of extra dye leftover.

Here's how to do some of the other fun tie dye patterns!
Use new colors and make all the tie dye shirts you can dream of!
Heart:
Same technique as the rainbow...fold shirt in half, draw half heart, scrunch the line so it all lines up...zip tie and dye!

Target or bullseye!
Just grab the shirt where you want the center of the target to be.
Then zip tie it and repeat for as many rings as you want!

Rainbow!
(full explanation and pattern technique posted above)

Pie shaped swirl!
Grab the center of the shirt and twist it in a spiral until it's all wound up.
Add a few rubber bands...color each "pie" section a different color.

Multiple Bullseye!
Same as the target or bullseye, but smaller and in different spots on the shirt.

Messy Spiral!
Same start as the pie swirl above...but add some of each color in each section

That's it!
Tie dying shirts is the perfect Summer activity for a big project count.
Invite friends, neighbors and families over...or use this as a Summer camp craft.
Save this post for reference for all things tie-dye fun!
Like, Pin and Share!
Check out my other Tie Dye posts!
Captain America Tie Dye Shirt

Tie Dye Party!

Halloween themed Tie Dye!

Galaxy Scarf!

Galaxy Dress!

Bleach Resist Tie Dye Galaxy!

Mermaid Scale Tie Dye Shirt


-min.jpg)


Comments