

Mandalorian Baby Yoda Wood Cut Out DIY!
Are you watching the Mandalorian Season 3?
Gonna be honest, I feel like it's been hijacked and polluted, like most sequels...so I'm not enjoying it as much as season one, so let's focus on the fun that was baby yoda.
Disney Plus was launched in November 2019 and with that came the Mandalorian series. This 8 episode series shows the Mandalorian acquire the bounty target, a 50 year old, which turns out to be this adorable little baby Yoda. The Mandalorian feels like a Western, Space Cowboy, kind of show...but I love it.

The real star of the show and the reason we're going to keep watching the Mandalorian--is this cute little child, named Baby Yoda by the entire internet, and revealed as Grogu (but we call him baby GooGoo). If you want to be sucked into an internet search, go ahead and look at Baby Yoda memes.
I knew that I needed to have some baby Yoda in my life too. Look at him with his cup of hot choccy. It's perfection. Check out this cute little tote bag too!

I hired my amazing daughter to draw me the perfect black outline of baby Yoda. I wanted it to be simple enough for coloring pages, shirts or for painting like this wood cut out I did. You can buy the file here: Baby Yoda SVG Download

Supplies Needed:
- Cricut Maker 3 or Cricut Maker
- Cricut Permanent Vinyl
- Cricut Transfer Paper
- Cricut Weeding/Scraping Tools
- Cricut True Control Knife
- Wood (Pine Board)
- Circle Compass
- Jigsaw
- Sand Paper
- Router
- Grinder
- Acrylic Craft Paint
- Paint Brushes
- Cotton Swabs

Step 1: Cut out and Trace
This cute Baby Yoda cut out is made as accurately as I could, measuring 16 inches tall. The vinyl was cut in 2 halves to fit the cutting mat.

Then trace the outline around the vinyl with a pencil.

Then remove the vinyl to reveal a baby yoda outline.

Step 2: Outline
Next use the compass with the pencil in place about an inch from the point. Then hold the point on the pencil line while making a new outline an inch out. This gives a great border so cuts and vinyl placement don't have to be so precise.

Now this wood cut out is ready to cut out!

Step 3: Cut out with JigSaw
I enlisted the help of my hunky husband. I didn't really need help, but it's fun for us to do projects together, so I like to let him help where he can. Plus, it's easier to take pictures of the process. We went outside to use the jigsaw to cut it out.

Step 4: Routing
Next he rounded off the wood edges with a router. Sandpaper works too!

And finished up with the grinder for some light sanding. Again, just sanding after cutting works great.

If you really want a baby yoda cut out but don't want the hassle of tools, get some foam core board and make it on that instead!

Step 5: Prep for Vinyl
Okay, now lightly erase the bulk of the pencil lines before placing the vinyl down. Despite my best efforts, lining up the vinyl perfectly is tricky...so erasing the dark lines first is easier before...however leave a faint line.

The 2 halves of the vinyl have been weeded then trimmed down the sides to fit close together.

Cut around the vinyl and line it up on the board to see how it fits. I was pleasantly surprised at how well this fit!

Step 6: Vinyl
Next, place half of the vinyl cut out on the table and then roll the transfer tape over the top, smoothing with a brayer while you go.

Use the scraper tool to press the vinyl on the transfer tape.

Then remove the backing of the vinyl and little half yoda is ready to apply to the board.

Do your best to line it up. I pressed it down too hard at this point...slightly too close on the left side...and didn't want to risk tearing or ripping the vinyl, so I went with it slightly off.

Then use the scraper to press the vinyl on the wood. Next, peel the transfer tape off the wood and vinyl carefully by rolling it over itself. Use the same transfer paper for the second half of baby yoda.

Line up the second half with the first and repeat the process for adhering the vinyl to the wood.

Use the True Control knife to trim any uneven parts in the vinyl.

Step 7: Paint
Then get some neutrals and greens and get ready to paint this little cutie!

I used an array of browns for the robe and the cup. Then a combo of green and blue for the baby skin with peachy pink ear insides.

Now color the image just like a coloring book! Add green to the skin of this cute baby space alien.

Then add pink to the inside of the giant pointy ears.

Don't worry too much about staying in the lines. I wanted to make sure to get the paint all the way to the edges of the vinyl, which meant overlapping a bit. I've never been good at staying in the lines anyway.

Step 8: Clean off Vinyl
Finally, finish off the piece by cleaning off the vinyl with a cotton swab. This part is very simple, the paint comes off the black shiny surface very easily...although I used about a dozen cotton swabs.

This little Baby Yoda from the Mandalorian is perfect for parties or just for looking adorable as home decor.

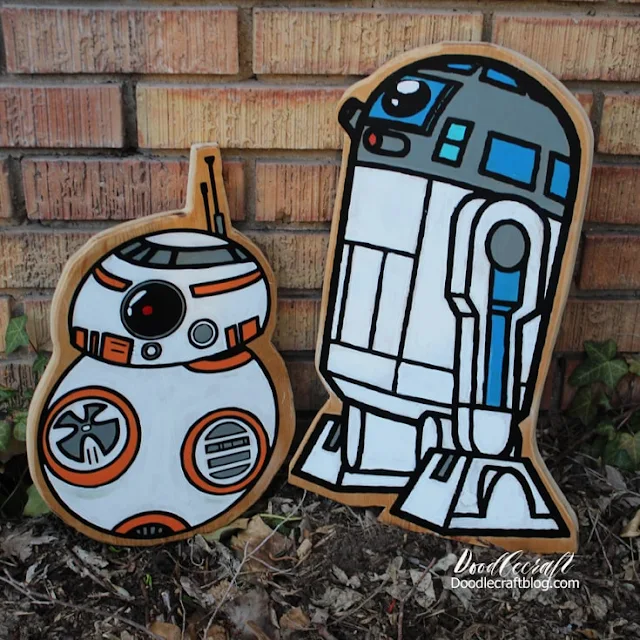
Remember these cute little droid cut outs I made a couple years ago...Baby Yoda fits in perfect with them! Here's the full post on them too!
That's it!
Like, Pin and Share!


-min.jpg)


Comments