
-min.JPG)
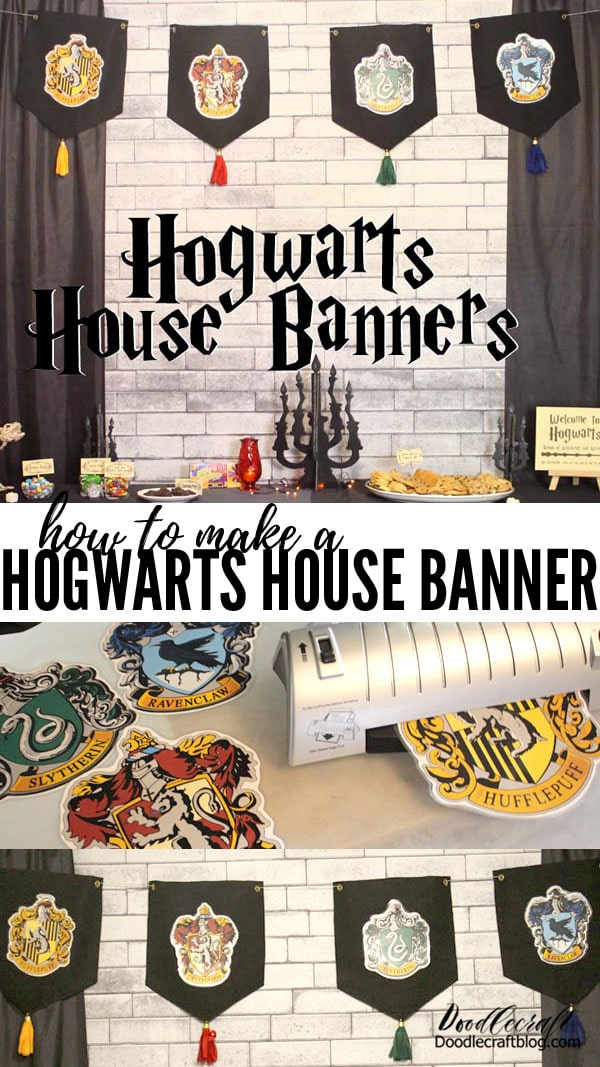
How to Make a Hogwarts House Banner DIY!
Make the Hogwarts House banner for the perfect Harry Potter party, home decor or geek/fandom inspired event!
Maybe you are planning the most epic Harry Potter wedding--this would be a great way to organize the house tables.
Let's get started with this simple DIY Hogwarts Crest Bunting!
Check out this post for a Hogwarts bunting made with the Cricut--and more Harry Potter craft ideas at the end of this post!
-min.JPG)
This is a fun banner and post I did back in 2016 and it's gotten SO MUCH LOVE!
I had to update it with current information and larger file downloads, so I hope it's helpful--leave me a comment if you use this idea!
Supplies Needed for Hogwarts House Banner:
- Color Printer
- Scotch Heat Laminator
- Black Felt (by the yard)
- Red, Blue, Yellow and Green Felt Strips
- Scarf End Caps
- Grommets and Setting Tool
- Twine
- White Cardstock (80 lb)
- Craft Sticks
- Needle and Thread
- Hot Glue/Gun
- Scissors
- Hogwarts Crest Logos
-min.JPG)
Step 1: Felt Tassels in Hogwarts House Colors
Begin by cutting felt strips, about 4 inches by 12 inches long.
-min.JPG)
Step 2: Fringe the Felt
Next, use sharp scissors to cut the felt about every 1/4" down the length of the strip of felt. Leave half of an inch uncut to make a row of fringe.
-min.JPG)
Step 3: Hot Glue Tassel
Now run a row of hot glue down the length of the felt where it is uncut.
-min.JPG)
Step 4: Roll Tassel
Quickly roll up the felt in a tight roll while the hot glue is hot and then hot glue the end down firmly.
-min.JPG)
Step 5: End Caps
Add a generous amount of hot glue to the end of the tassel, where it's tightly rolled together.
-min.JPG)
Then stick it inside the brass end cap for the perfect tassel.
-min.JPG)
Repeat the tassel making process for each of the Hogwarts house colors.
I picked red, green, yellow and blue...but you could find closer matches if you desire it.
-min.JPG)
Okay, the next step for the Hogwarts House banner is the crest logo's for each house.
I found these images online and edited them slightly so they would all match.
They are FREE for personal use, please don't sell.
Here's the link for the high resolution photos.
-min.jpg)
-min.jpg)
-min.jpg)
-min.jpg)
Step 6: Prints
Okay, save off the images found at the link above.
Then print the Hogwarts House crests off in full color on a piece of cardstock for extra durability.
Then cut the crests out leaving a little paper border around the gray edge...or cut right to the black line depending on your personal preference.
-min.JPG)
Step 7: Laminate Hogwarts House Crests
Place the cut images in the heat laminator sleeves.
Then run them through the heat laminator for a water resistant and durable finish.
-min.JPG)
Step 8: Black Felt Bunting
Cut the black felt in big bunting pieces. Make them 12 inches wide and 16 inches tall cut to a point in the center.
Then center the Hogwarts crests in the center and use a little hot glue to hold them in place. Not too much or the plastic will melt or warp.
-min.JPG)
Step 9: Needle and Thread
Now use a needle and thick thread to sew the tassels onto the point of the felt buntings.
These could also be hooked on with a safety pin or even hot glue if you aren't one for hand sewing.
-min.JPG)
Step 10: Grommets and Sticks
Use the grommet tool kit to set a grommet on each top corner of the buntings.
You can also just punch a hole and it shouldn't fray because it's felt.
Then hot glue flat tongue depressor craft sticks across the top of the buntings so they will stay stiff and not sag when hung.
-min.JPG)
Step 11: Twine
Finally thread some twine through the grommets and then the Hogwarts House Banner is ready to hang up at the party!
-min.JPG)
That's it!
This banner is light weight and easy to hang with command hooks. I love the look of it--it's perfect for a Harry Potter party, wedding, event, or bedroom decor!
-min.JPG)
Let me know if you use this as inspiration for your Harry Potter fun in the comments!
Like, Pin and Share!
Here's more!

-min.jpg)


-min.jpg)


Comments