
-min.jpg)
Mini 3 oz Tumbler Sublimation Template!
Sublimation mini tumblers--everyone needs a mini tumbler--they are so much cuter!
These darling 3 oz tumblers are so cute and the perfect little sublimation project!
I designed a template for the top and bottom of them and it's free at the end of this post!
This is my last freebie of the 12 days of Giveaways--I hope you've loved them!
-min.jpg)
Isn't everything miniature so much cuter!
These little sublimation tumblers are just 3 ounces.
They stand about 3 inches tall and are just perfect for drinks you only need a bit of...like Egg Nog or adult beverages.
Let's be real though...I'm drinking anything and everything out of these!
-min.jpg)
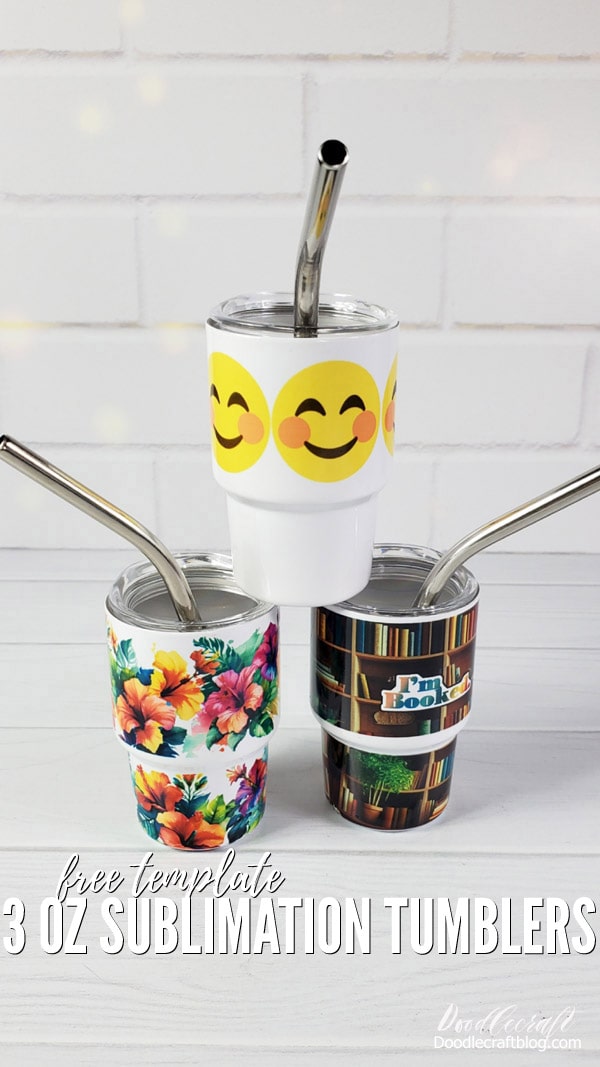
I made three designs so far, hibiscus, of course.
A book lover version and my favorite little rosy cheek emoji face.
The BEST PART is that I designed a template to make your own, it's a png, so it can be used in any editing program...and it's FREE at the end of this post!
-min.jpg)
The STAR of the SHOW is the 3 ounce Mini Tumbler Shot Glass!
Such an adorable little tumbler!
-min.jpg)
-min.jpg)
Supplies Needed for Mini 3 oz Tumbler Sublimation:
- 3 Ounce Tumblers (White or Colored) or...buy both!
- PNG File (Template free at the end of the post!)
- Sublimation WALAPress Oven from Heat Transfer Warehouse (Read all about it here)
- Epson Ecotank Printer Converted to Sublimation
- Sublimation Paper
- Heat Gun
- Shrink Plastic
- Heat Resistant Tape
- Heat Resistant Tape Dispenser (optional but super nice)
- Lint Roller
Guys, let's chat:
I've reviewed a lot of heat presses for tumblers. (watch this Youtube video)
I like them all for different reasons...but if I could only have one of them...it would be this one.
The oven is so versatile...and it can do the 40 ounce Stanley Dupe and the 3 ounce Mini Tumblers.
This is the one.
-min.jpg)
Step 1: Print Sublimation Image
Use the FREE Template for the Mini 3 oz Sublimation Tumbler and design your image.
There's these 3 I did included too, if you just want to get started.
Then print them on a sublimation printer or an eco-tank printer converted to sublimation.
Then cut out the design close to the edges, I use a paper cutter, but scissors on the curved base.
-min.jpg)
Step 2: Tape to Tumbler
Start by using a lint roller on the mini tumbler and clean off any lint, dust or debris.
Place the sublimation paper with the ink pressing firmly on the tumbler and use the heat transfer tape to hold it in place.
Tape it down on all the edges.
-min.jpg)
I made the template in 2 pieces.
The top piece is straight and the bottom piece curves.
Unfortunately, it makes the bookshelf design I made a little wonky, but you can decide what you think.
-min.jpg)
Tape down every edge of the paper to prevent ghosting, fading or a fail.
I have had no issues with yellow heat resistant tape, although I've heard others have.
I'm really not sure what the difference is here, but it's worked every time for me.
-min.jpg)
Step 3: Shrink Plastic
Next, the only requirement to the sublimation tumbler, is that everything needs to be shrink wrapped.
It holds the paper tightly to the blank, like a press.
So get a shrink plastic sleeve, cut it in half and use a heat pen to shrink it tightly around the tumbler.
-min.jpg)
Step 4: Sublimation Oven
Set the sublimation oven to 360*F and the timer to 5 minutes.
The sublimation oven is awesome because you can bake more than one tumbler at a time...but they should be spaced at least an inch apart and not touching.
Place the mini 3 oz sublimation tumblers in the oven and close the door.
Click the start button.
The oven will heat up and then beep, at which point it begins the timer.
-min.jpg)
Quick Tip:
How long should I heat a Mini 3 ounce Sublimation Tumbler???
5 minutes at 360*F
-min.jpg)
Step 5: Reveal!
I find it best to remove the shrink plastic when it is still warm.
I don't know if it's better for the print...but it's at least easier for me. lol.
-min.jpg)
If they cool, they shred, break and stick--it's so frustrating.
When it's warm still, it stretches off pretty painlessly.
-min.jpg)
Then peel off the sublimation paper and reveal the vivid bright colors!
I love seeing a successful tumbler reveal!
-min.jpg)
Repeat 5 more times! Or many many more times--stock up on those mini sublimation tumblers!
-min.jpg)
These cute tumblers would be a fun girls night craft, for about $5 each!
They would make an adorable little stocking stuffer, a handmade gift or just a fun reason to craft!
-min.jpg)
I love the vibe of the book lover one, the "I'm booked" looks like a sticker but in future, I wouldn't put the bottom wrap on it...it's too wonky.
-min.jpg)
That's it!
Which of these mini 3 oz sublimation tumbler designs is your favorite?
I want to get the colored ones too!
I have so many fun ideas for these little sublimation tumblers.


Comments