
-min.jpg)
How to Use Mod Podge Crackle Finish!
Learn how to easily add weather and crackling to wood paint with Mod Podge Crackle finish.
It's easy to use and gives a unique finish to a painted project.
See how it adds texture and depth to this wood picture frame in one easy process, this crackle effect works on anything you paint, knick-knacks, candlesticks, decor, signs and more!
-min.jpg)
I love thick, peeling and cracking layers of paint.
Like and old barn with years of paint painted over old paint or wood fence with layers of protective finish paint that never quite holds up in the Summer sunshine.
I love the character and the story the wood, layers of paint and the weathering encapsulate.
It's easy to recreate the character of crackled wood using this new Mod Podge product!
-min.jpg)
Supplies Needed for Mod Podge Crackle Project:
- Wood Blank (I am using a thick, chunky wood frame with a 4x4 square opening)
- Mod Podge Crackle Finish
- Acrylic Craft Paint (I am using Aqua and Blue Ocean Multi-Surface Paint)
- Ceramcoat Gold Paint
- Paint Brushes
-min.jpg)
Step 1: Paint the Blank
Begin by painting the blank wood.
I started with a light layer of gold paint, because I wanted to see if I would be able to see the gold peeking through...and I wasn't.
So just start the project by painting the blank the color you would like it to be.
-min.jpg)
Again, paint the blank.
I used a mix of Aqua and Blue Ocean on this wood frame because I wanted it to have a rustic toned look.
By giving it both colors it makes it appear even more aged from the start.
-min.jpg)
You can see as the paint dries, it's giving some subtle differences in the paint color.
I did a thick layer of paint and let it dry overnight--not because I "had" to, but because I ran out of crafting time one day and had to finish it up the next day.
-min.jpg)
Step 2: Mod Podge Crackle
Now for the Mod Podge Crackle.
The finish has directions on the package that instruct to apply the Mod Podge in a thin layer, without painting over it multiple times or being too fussy with it.
Just thinly coat and let it dry.
-min.jpg)
I removed the seal from the Mod Podge Crackle and dipped my paintbrush right inside.
-min.jpg)
I actually did some parts of the Mod Podge Crackle in thin strokes, and other parts thick to see which worked best.
Turns out, I had better crackling where it was a little thicker...so I'm not sure a thin layer is necessary.
-min.jpg)
Then let the Mod Podge Crackle dry.
As it dries, the cracks begin to appear!
-min.jpg)
The crackling is awesome!
It worked surprisingly well, but there is not a lot of contrast and the cracking is smaller than I expected.
I like the effect and will try a few other projects to see if I can consistently make the cracking more impressive.
In the meantime, the bottle works exactly as described!
-min.jpg)
Step 3: Increase Contrast!
In order to increase the contrast of the cracks, adding a contrasting color into the cracks is a great way to bring them out.
I picked gold, but it's very metallic.
In the future I would probably do black or white to increase the contrast.
For this project, the gold is a really pretty finish though.
-min.jpg)
The directions on the bottle recommend diluting some paint with water and brushing it on the surface, letting it get into the cracks, then wiping the surface to remove any paint.
I tried this technique with the gold and it didn't feel like I could get enough in the cracks.
-min.jpg)
So I used my fingers and straight paint and worked it into the cracks in the paint, then wiped the surface with a baby wipe.
-min.jpg)
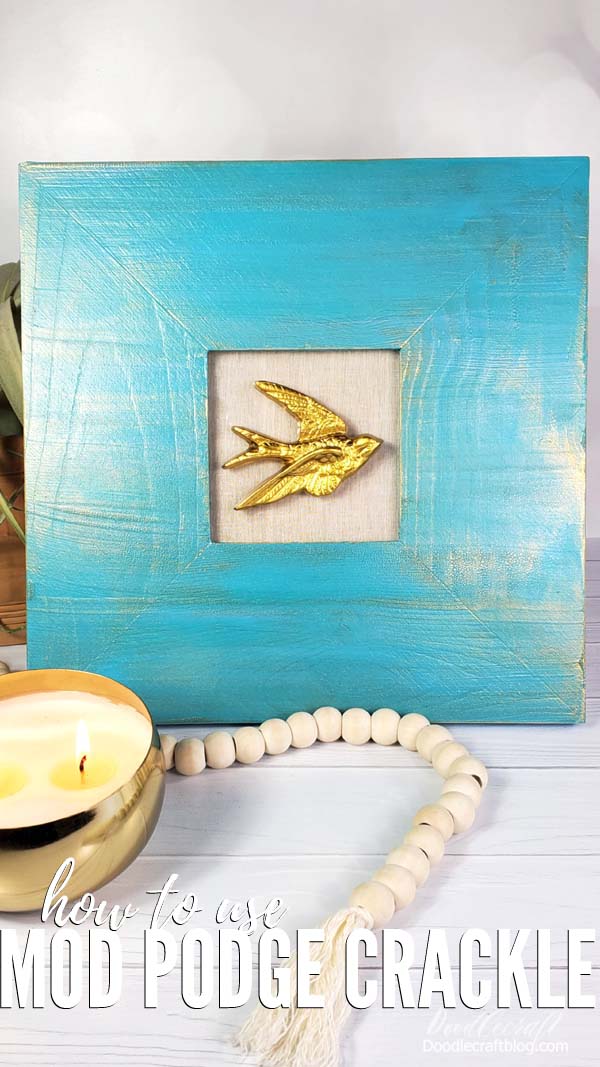
Look how amazing a close up of the crackle finish looks on the frame!
I love the gold peeking through the aqua.
This has got to be one of my absolute favorite color combos.
-min.jpg)
Step 4: Finishing Touches!
As far as the Mod Podge Crackle finish goes, that's it!
Just a few finishing touches for my project.
I painted this little resin sparrow or swallow with the same gold acrylic paint.
-min.jpg)
I fit some linen in the frame opening and hot glued the bird right on the glass.
I love it!
It's giving me beach vibes...like a sand dollar would look great in this frame too.
It would be easy to add some vinyl lettering to this frame and add a picture inside.
I love the subtle shimmer of the gold and the texture of the crackles.
-min.jpg)
This Mod Podge Crackle finish is a great finish for holiday projects!
I can see it working really well for anything Halloween, spooky, creepy and ghoulish!
I can see it having a very Autumn vibe for harvest or Thanksgiving crafts.
And I think it will be gorgeous on some Christmas signs too!
What would you paint Mod Podge Crackle on?
-min.jpg)
That's it!
Hope this fun and easy craft shows you how easy it is to use Mod Podge Crackle on your painted projects and gives you lots of great ideas!
I love how easy it is to add weathering, texture and a fun finish to a wood painted piece!
Like, Pin and Save!
Check out these fun Plaid Paint Products too!
-min.jpg)
-min.jpg)
-min.jpg)


-min.jpg)


Comments