How to Make Color Shift Watercolors DIY Tutorial


This post may contain affiliate links, sponsored content and products received at no cost.
6:00 AM
How to Make Color Shift Watercolors! Learn how to make your own homemade color shift watercolors. Color shifting watercolors are amazing! They can be pricey and hard to acquire...I know, I've tried!   I decided the best way to get what I wanted was to make it myself. It's hard to find a great tutorial on homemade watercolors, so this tutorial is my gift to you! This tutorial is all the tips and tricks, supplies and process needed for making your own homemade watercolors.  Plus--stick around for a Color Shift Watercolor Giveaway at the end of this post!

How to Make Color Shift Watercolors DIY Tutorial!


Learn how to make your own homemade color shift watercolors. Color shifting watercolors are amazing! They can be pricey and hard to acquire...I know, I've tried!


I decided the best way to get what I wanted was to make it myself. It's hard to find a great tutorial on homemade watercolors, so this tutorial is my gift to you!


This tutorial is all the tips and tricks, supplies and process needed for making your own handmade watercolor paint.


Learn how to make your own homemade color shift watercolors. Color shifting watercolors are amazing!

Okay, let me be honest. 


Handmade colorshift watercolor paint making is a PROCESS, it takes a long time. It's not something I want to go into business doing. 


I sold a few sets around the holidays to offset the cost of my expenses, but I'm not planning on selling any more.


But it's a new fun way to make something yours...using natural pigments and distilled water with a touch of magic!


Watercolor paints are my favorite medium. I love mixing mica powder in it for a dynamic shine!


Okay, let me be honest.  Homemade watercolor making is a PROCESS. It's not something I want to go into business doing. However, I have a bunch of watercolor tins for sale in my Etsy shop--get them now in time for the holidays.   I've got enchanting 4 half pan palettes that are the perfect exposure to color shift watercolors if you just want to give them a try. The colors are shimmery and fun to paint or hand letter with.

The color shift paints look different on white watercolor paper versus black watercolor paper.


 The white paper gives a light pastel shimmery effect. It is great for layering on other projects to add the most wonderful glimmer.


On black surfaces, the watercolors shift into the most vivid metallic finish! By shifting the paper in the sunlight, the colors shift and dance. 


Each color I made is my favorite! I named them all and love painting with them.


The color shift paints look different on white versus black paper. The white paper gives a light pastel shimmery effect. It is great for layering on other projects to add the most wonderful glimmer.  On black surfaces, the watercolors shift into the most vivid metallic finish! By shifting the paper in the sunlight, the colors shift and dance. Each color I made is my favorite! I named them all and love painting with them.

Supplies Needed for Homemade Color Shift Watercolor:

affiliate links--continue shopping:

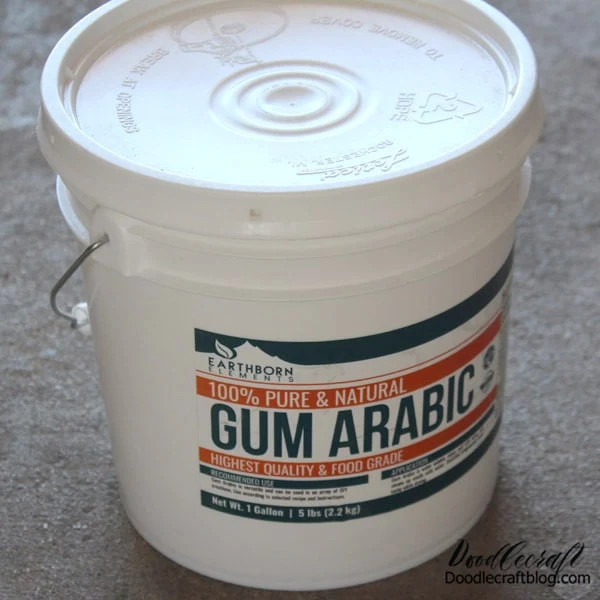
Supplies Needed for Homemade Color Shift Watercolor: Gum Arabic Color Shift Pigment Powder Glass Cutting Board Watercolor Half Pans Metal Hinged Tins Adhesive Magnets Glass Muller Palette Knife/Spatula Honey Clove Oil Water

The supplies for making your own homemade watercolors adds up! From the mica pigments to pans and tins.


This is a rabbit hole of options...especially if you swing for the one gallon bucket of Gum Arabic, which is the more cost effective option in the long run.


Maybe you'll want to start your own watercolor making business for the full potential. I for sure don't, but I like to cover my costs with a few paint set sales.


You may have a need of more storage once you start making these gorgeous color shifting watercolors!


You can buy smaller sizes, minimum purchase of product, to just get started and then decide if you like it enough to buy bigger quantities.


Recipe at the end of the post!


The supplies for making your own homemade watercolors adds up! This is a rabbit hole of options...especially if you swing for the one gallon bucket of Gum Arabic, which is the more cost effective option.   Maybe you'll want to start your own watercolor making business. I for sure don't, but I like to cover my costs with a few sales.

Step 1: Watercolor Base


Begin by making the watercolor base. Fill a measuring cup with 1 cup of water...not hot water, but warm. Gradually stir in 1/2 cup of Gum Arabic. 


Whisk it gently to mix in the clumps. Stir until the clumps are all mixed in. (Can strain through a cheesecloth if it's still lumpy, but I had no problem with clumps).


Then add 1/5 cup of honey and stir in until smooth. Add 6 drops of clove oil as a preservative and gives it a great scent!


Step 1: Watercolor Base Begin by making the watercolor base. Fill a measuring cup with 2 cups of water...not hot, but warm. Gradually stir in 1 cup of Gum Arabic. Whisk it gently to mix in the clumps. Stir until the clumps are all mixed in. (Can strain through a cheesecloth if it's still lumpy, but I had no problem with clumps)  Then add 1/5 cup of honey and stir in until smooth. Add 6 drops of clove oil as a preservative and gives it a great scent!

Now the watercolor base is made. You can store it in the fridge up to 2 weeks, if you don't use it all in one sitting.


(Do not store at extreme temperatures)


Now the watercolor base is made. You can store it in the fridge up to 2 weeks, if you don't use it all in one sitting.

Step 2: Watercolor Mixing


Now set up your workstation. You will want a big glass cutting board. 


I'm only doing a tablespoon of pigment at a time so the glass cutting boards listing in the supplies list are what I use. 


If you are going to mass produce them, you'll want much more space.


Step 2: Watercolor Mixing Now set up your workstation. You will want a big glass cutting board. I'm only doing a tablespoon of pigment at a time so the glass cutting boards listing in the supplies list are what I use. If you are going to mass produce them, you'll want much more space.

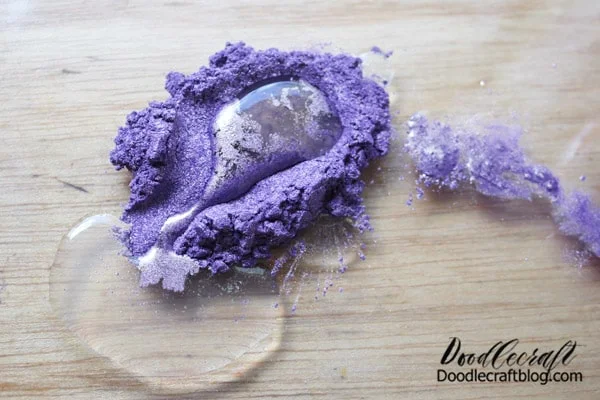
Scoop 1 tablespoon of pigment powder on the cutting board. See how it's purple with undertones of gold? 


It's the color shift magic!


There are other kinds of watercolor medium additives you can add to the liquid base.


This quantity filled up 4 half pans of watercolor paint mixtures for the first mixing.


Scoop 1 tablespoon of pigment powder on the cutting board. See how it's purple with undertones of gold? It's the color shift magic!  This quantity filled up 4 half pans for the first mixing.

Then pour one tablespoon of watercolor base on the pigment, like gravy on mashed potatoes.


So one part pigment and one part of the liquid base mixture.


Then pour one tablespoon of watercolor base on the pigment, like gravy on mashed potatoes.

Then use the palette knife/spatula tool to gently mix the pigment with the base. You will see there are little powder chunks in the mixture. 


I used this palette spatula from the dollar store and it snapped in half. You'll want a metal one for this amount of mixing.


Once mixed in, you likely need to add a little more watercolor base. The consistency should be like warm honey, thick but pourable.


Then use the palette knife/spatula tool to gently mix the pigment with the base. You will see there are little powder chunks in the mixture. I used this palette spatula from the dollar store and it snapped in half. You'll want a metal one for this amount of mixing.  Once mixed in, you likely need to add a little more watercolor base. The consistency should be like warm honey, thick but pourable.

This is where you will need the muller. 


I am using a flat bottom shot glass...so check out the local thrift store for the perfect small glass that will work just as well. 


Press the muller on the watercolor mixture and blend it around. 


The glass on glass will make the powder burst into the base and not have any clumps when painting, this mixture is a great representation of the actual colors.


This is where you will need the muller. I am using a flat bottom shot glass...so check out the local thrift store for the perfect small glass that will work just as well.   Press the muller on the watercolor mixture and blend it around. The glass on glass will make the powder burst into the base and not have any clumps when painting.

Now use the spatula to scoop up the mixed watercolor and pour it into the plastic pans. 


Then set them aside for a couple weeks to dry. 


Don't speed up the drying process with a dehydrator, it is better to let them dry naturally.


Now use the spatula to scoop up the mixed watercolor and pour it into the plastic pans. Then set them aside for a couple weeks to dry.

As they dry, the water evaporates, leaving a condensed piece of watercolor. But at this point, it only fills up about half of the container. Here's where the long process comes in.


Now repeat the mixing and filling and setting aside. 


The filling process will most likely take 3-4 fills to keep a good height on the pans. 


Mine are not perfect...there are air bubbles here and there. 


As they dry, the water evaporates, leaving a condensed piece of watercolor. But at this point, it only fills up about half of the container. Here's where the long process comes in.  Now repeat the mixing and filling and setting aside. The filling process will most likely take 3-4 fills to keep a good height on the pans. Mine are not perfect...there are air bubbles here and there.

After the watercolor is dry, they are ready to add a drop or 2 of much water and begin painting, lettering, calligraphy, watercolor art or just accenting.


I know some people use this as make up, for external use, but I have not painted this on my skin.


After the watercolor is dry, they are ready to add a drop or 2 of water and begin painting, lettering, calligraphy, watercolor art or just accenting.

I love the shimmer of the metallic shift! Which color combo do you like best?


I named them all personally based on my trip to the Turks and Caicos islands, because that's something I love--I'm a tropical girl through and through!


Starting on the top row from left to right:

Ocean, Ice Crystal, Hibiscus, Caribbean, Orchid, Pearl, Coral, Lucky Dragon, Rose, Mermaid, Lilac, Pegasus, Gold, Pewter, Sea Witch, Copper, Pearl and Orchid...yes, there ended up being more orchid and pearl than other colors...arabian night is another great name!


I did 6 more colors too, and you'll see them here and there in the ones I am selling.


I love the shimmer of the metallic shift! Which color combo do you like best?  I named them all personally, because that's something I like doing! Starting on the top row from left to right: Ocean, Ice Crystal, Hibiscus, Caribbean, Orchid, Pearl, Coral, Lucky Dragon, Rose, Mermaid, Lilac, Pegasus, Gold, Pewter, Sea Witch, Copper, Pearl and Orchid...yes, there ended up being more orchid and pearl than other colors. I did 6 more colors too, and you'll see them here and there in the ones I am selling.

And here's how the 21 colors look on black and white paper together. My favorite watercolour paint color is Caribbean for sure!


Several of the colors have a fabulous gold shift!


And here's how the 21 colors look on black and white paper together. My favorite color is Caribbean for sure! Several of the colors have a fabulous gold shift!

Step 3: Packaging


After the paints dry they are ready for a strip of adhesive magnet placed on the base of the pan. This will keep them in the tin without shifting around.


Wrap the watercolor pans in wrapping paper if desired.


Step 3: Packaging After the paints dry they are ready for a strip of adhesive magnet placed on the base of the pan. This will keep them in the tin without shifting around.  Wrap the watercolor pans in wrapping paper if desired.

Now they are ready to gift, sell or just enjoy--paint all the things with stunning shifting watercolors!


There's a huge amount of accomplishment being able to make my own watercolors. It was a lot of time, patience waiting, and start up expense...but it was fun. 


Do you think you'll try to make your own watercolors? If you do, please follow up and let me know! I'd love so see your paint on social media--just tag @doodlecraft so I can cheer you on!


Now they are ready to gift, sell or just enjoy!  There's a huge amount of accomplishment being able to make my own watercolors. It was a lot of time, patience waiting, and start up expense...but it was fun. Do you think you'll try to make your own watercolors?

I love the difference between using white or black paper--I think black paper turns out the best, it's classic and so shiny and shifty.

The pigments just shine on black paper.


I love the difference between using white or black paper! The pigments just shine on black paper.

Here's the watercolor base recipe:


Begin by making the watercolor base. Fill a measuring cup with 2 cups of water...not hot, but warm. Gradually stir in 1 cup of Gum Arabic. Whisk it gently to mix in the clumps. Stir until the clumps are all mixed in. (Can strain through a cheesecloth if it's still lumpy, but I had no problem with clumps)  Then add 1/5 cup of honey and stir in until smooth. Add 6 drops of clove oil as a preservative and gives it a great scent!

Like, Pin and Share!


How to Make Color Shift Watercolors! Learn how to make your own homemade color shift watercolors. Color shifting watercolors are amazing! They can be pricey and hard to acquire...I know, I've tried!   I decided the best way to get what I wanted was to make it myself. It's hard to find a great tutorial on homemade watercolors, so this tutorial is my gift to you! This tutorial is all the tips and tricks, supplies and process needed for making your own homemade watercolors.

Here's a sample of the watercolor sets I sold in my Etsy shop last year, priced with free shipping  (united states usd) of course:

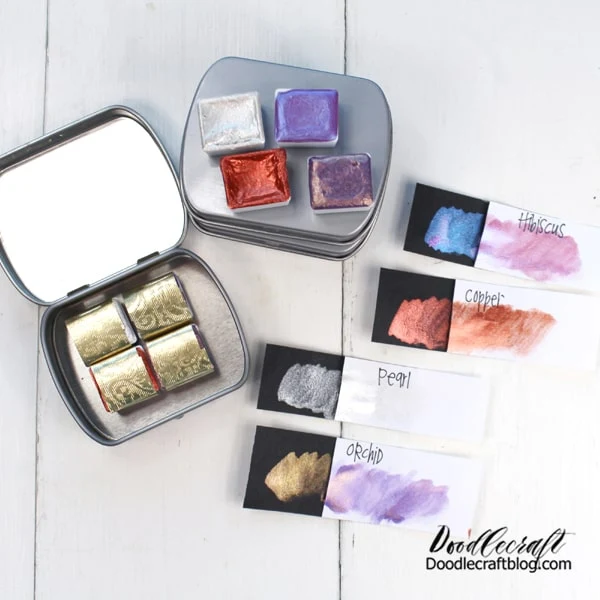
This looks like a slightly interesting combo at first glance...but see the colors painted on black and white paper. There's a copper metallic, pearl that's perfect for snowy shimmer, gold shift and blue.

And now for a Watercolor tin giveaway! This looks like a slightly interesting combo at first glance...but see the colors painted on black and white paper. There's a copper metallic, pearl that's perfect for snowy shimmer, gold shift and blue.

Have you tried making your own Watercolors?

Did this tutorial help you?

Enter the giveaway to win a set of Bliss Watercolors!  This set contains: Orchid (Purple to Gold shift) Hibiscus (Blue to Violet shift) Pearl Metallic Copper Metallic

Here's some more Watercolor posts you might love!


facebook Follow Me on Pinterest Youtube Instagram twitter 
postscript

Comments

Laura said…
These are amazing! I think my favorites are pearl and hibiscus. I hope I win some for my sister in law who is a great artist.
Melissa Storms said…
It is hard for me to pick a favorite between the orchid and hibiscus. I do think the orchid has slight lead though.
PinkFeline said…
This is soooooo awesome!! I had no idea this was something you could make at home. :) My favorite is Pegasus--both the color and the name!
Miss Punches said…
Could you please verify your recipe? The amounts are different between descriptive post and the recipe card.
Doodlecraft said…
Yes, my mistake! The recipe card is correct and the post has been fixed. Thank you!
Shelley Noble said…
Truly the best DIY paint tutorial I've found. Thank you for the careful instructions.
Doodlecraft said…
Thank you so much for taking the time to leave a sweet comment! You have no idea how it fuels my passion for bringing you more free tutorials! I know I searched and searched for homemade watercolor tutorials and couldn't find any...so I was hoping it would fill a gap! Thanks again! :)
Jenny said…
I've been working with some color shift pigment, some come out great, but the last couple the pigment settled to the bottom. What is causing this? Could it be that my binder is off? Not enough gym Arabic? I poured in layers, but it still wants to settle, like it's not completely adhering to the binder. Or maybe that's just the nature of pigment That is more like mica rather than pure pigment. I've made other types of watercolor with regular pigment. And I've made combinations. Should I start with a regular mineral pigment that will adhere to the binder, then add the color shift? It's super shift and pricey so I'm hoping to get some feedback before I try to rework it. I've had other shifting pigment work fine but I think I did mix it with other stuff. Anyway I would be so grateful for feedback! Thank you!
Doodlecraft said…
Hi Jenny, I'm so happy you're making watercolors! I haven't worked with heavy micas before so I'm not sure the best way to combat the settling. I'm guessing regular pigment first and then add the shift, but again, it's not something I've done yet. Maybe ask a few other watercolor makers and see if anyone will tell their trade secrets! ;)