This post may contain affiliate links, sponsored content and products received at no cost.
6:00 AM
Watercolor Floral Painted Tote Bag DIY
Watercoloring florals is much simpler than you think! Watercolors and florals are huge...they are everywhere! It's time you make your own--and with this tutorial it couldn't be easier! This cute canvas tote bag is easy to add colorful florals to in just about an hour. Hot pinks, corals, greens, blues and violets!
Last month Plaid Crafts had a Facebook Live painting instruction night to show how to paint a floral tote. Unfortunately, I missed the instruction live, but watched it afterwards. Here's my tutorial with my style and take on the paint night. This would be a really fun craft night or summer camp craft.
I received the Watercolor Soft Gels and Brushes from Plaid Crafts.
The fabulous Organic Cotton Tote is from Tote Bag Factory.
(non affiliate links)
Supplies needed: Organic Cotton Canvas Tote Bag
Watercolor gel paint (10 colors)
Paint Brushes
Water
Cardboard lining for tote
I did end up using all 10 of these colors and mixed a custom color...so 11. I love the depth of adding shades of colors. This paint is thick and kind of chunky looking. It's great. Just add water. It really does well by adding water and letting it mix in a little.
Begin by slipping cardboard inside the tote bag, this will prevent the paint from soaking through to the backside of the bag. Lift the tote bag up several times while painting, to keep the bag from sticking and drying to the cardboard.
~
Here's a fun gif animation of the painting rose process. The small round brush is my favorite tool to create natural looking petals and leaves. Add water to the paint as you paint for smoother lines.
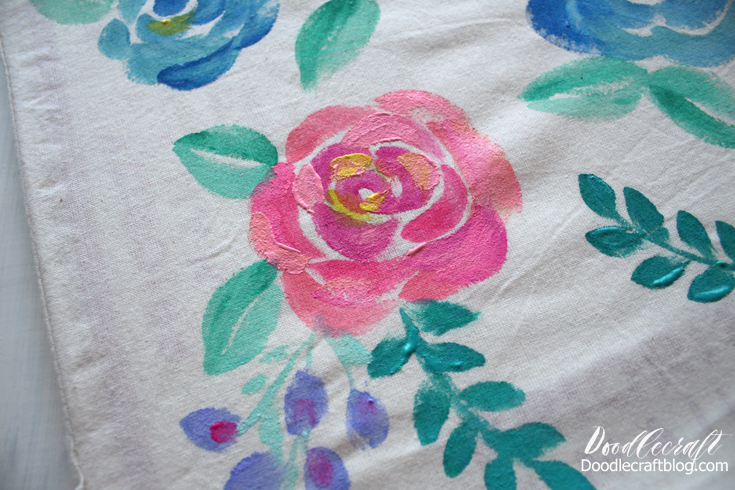
Begin with a "C" shape and then add "crescent moon" shapes around it.
Start with a darker color in the center, where the petals are dense and less light shines through them. Then work your way around the center getting lighter and lighter shades of paint. Leave those tote bag gaps between the petals. Simply adding more water to the paint will lighten the colors a bit too.
Leaves are fun to paint. Do half the leaf with a dark shade of green and the other side with a light shade of green.
Fill the canvas tote with flowers, leaves and then start adding little purple buds...lilacs...berries?
After the paint dries a bit, go in and add additional colors. I like adding yellow or blue to the leaves...some yellow in the centers.
Then paint in some ferns...this is where I mixed up a teal with some of the dark blue and the green paint.
Using the paintbrush to make the leaf shape is easy to just press down, glide and lift up.
Add pinks in the purples.
After the roses are dry, go in over the top and add some chaos to them. Add more petals right over the top of existing ones. Still leave some canvas "negative space" showing.
Just dab on little bits of color here and there.
I love abstract painting...so the more abstract the roses look, it's a win to me!
Paint until you are satisfied. Let it dry and letter some Calligraphy on it...or leave as is. After it is completely dry, use an iron to heat set it.
Enjoy the bag or gift it to someone! It's a portable work of art filled with delightfully Springy florals!


-min.jpg)


Comments