
")
How to Make a DIY Sandwich Bag Wreath!
This fun and festive sandwich bag wreath is perfect for outdoor decoration...hang on the fence, front door or even hang in the trees!
This is a simple craft that is great for having lots of helpers. Teach kids how to tie a simple overhand knot in a format that is much more fun than just tying and untying.
")
I love Christmas in July, it's the perfect time of year to knock out a few winter projects so they are ready to go in December...or November, if you are like me!
Make a bunch of these this week and store them in a garbage bag in the loft until it's time to decorate for the holidays.
*UPDATED, original post was in 2016, with a couple blog updates along the way.
")
Supplies Needed for DIY Sandwich Bag Wreath:
- Wire Hanger
- Red Duct Tape
- Twist Tie or Flexible Piece of Wire
- Scissors (non stick)
- Box of sandwich fold top bags (about 100-125 bags needed per plastic bag wreath)
You could cut up grocery bags, plastic shopping bags or use other kinds of plastic bags and use them if you want to do some upcycling!
Last year, some friends of mine made a bunch of these to decorate a senior center for the holidays!
")
Step 1: Wreath Form Making
Begin by bending out the hanger into a circle, it's simple and light weight enough to do with just your hands.
The wire coat hanger hook makes it easy to hang up when it's finished.
This wreath form made from a hanger is ideal to a premade wreath form because of the hook all ready to hang on a fence or post.
")
Step 2: Sandwich Bag Tying
Next step is to take a sandwich bag and squeeze it tight, so it's more of a rope.
Then tie it in a simple overhand knot around the hanger at the middle of the bag, not a double knot, a single overhand knot was enough to hold the bag on the wire hanger tightly.
")
Repeat a hundred times with the rest of the sandwich baggies...seriously though, about 125 times or so.
Slide and squish the sandwich bag knots as close together as you can to make the wreath really fluffy and full.
")
This was a great activity for my tween little girl but would be perfect for lots of little hands helping tie knots around the wreath.
Many hands make light work...or less tying per person!
")
This small lunch bag wreath would be a fun craft night for youth, activity days girls, or camp craft!
Once it's completely covered in bags, take some time to fluff it up.
Pull the edges of the sandwich bags open slightly while fluffing...all fluffed out it looks almost like a white wreath with shiny edges.
It's slightly transparent, shiny in the sunlight and looks almost like snow--perfect for all winter holiday season!
This cute wreath could be adapted to a Spring wreath with some plastic Easter basket grass tied on the wreath form too.
Again, this wreath could be altered for a Halloween wreath too, but cutting up black garbage bags or gallon trash bags into strips and tying them on the wreath form.
You could also use fabric scraps and tie them on a wire hanger wreath form, no hot glue or glue guns needed!
")
Step 3: Make a Bow!
Now it needs some color.
Get some ribbon or some colored duct tape...I chose red so it has a Christmas wreath feel, but make different bows to match your theme.
")
Roll out a piece of Duck Tape that is about 18 inches long and place it sticky side up on the table.
Then repeat the process, but with the second piece of tape, place it right on top of the sticky tape...sticking the sticky sides together.
Now it is just like waterproof ribbon, perfect for an outdoor wreath.
")
Next loop over the ends of the tape strip and tape them together in the center.
")
Then gather the center of the bow, scrunching it with your fingers.
")
Next, wrap the center of the bow with some more tape.
")
Repeat the tape ribbon making process from earlier to make little tails for the bow.
")
Finally, cut the ends with the scissors in a decorative cut and then tape the tails to the bow body.
")
Then simply attach the bow to the wreath with a twist tie or small wire pushed through the back of the center of the bow and twisted around the wire wreath form.
That's it!
Make a dozen of them and hang them along the fence...put one of the front door, hang them in the trees, give them out as neighbor gifts, decorate an elderly person's home, or hang them up around the office!
It's a easy DIY project that is a great idea for gifting!
")
That's it!
Making a DIY Sandwich Bag Wreath for Holiday, Home or Christmas decor is easy and so much fun!
It's a very economical craft that you can make even using upcycled plastic bags from the grocery store.
Perfect for decorating an office, outdoors around the fence or on the front door with a little welcome sign.
The plastic is great for outdoors and all kinds of weather, it's a good idea for decorating on the cheap!
Like, Pin and Save!
Check out these fun and economical holiday crafts too!
Wooden Christmas Tree Display!
-min.jpg)
Jar Lid Ornaments
-min.jpg)
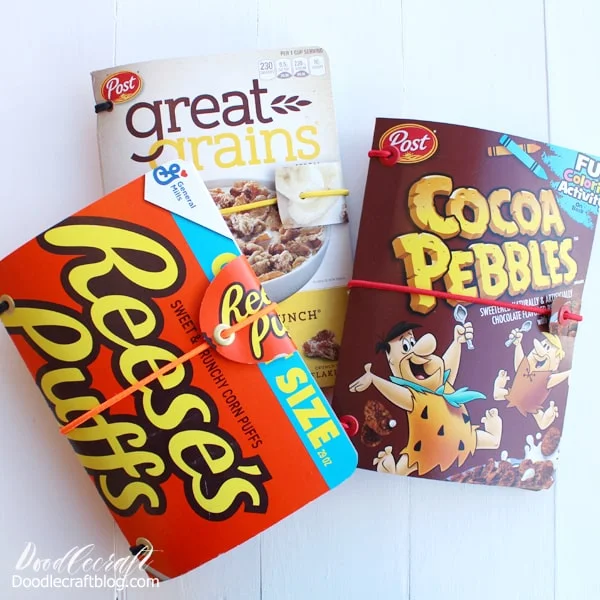
Cereal Box Refillable Notebooks
These awesome notebooks hold paper folded in half--and they are made of old cereal boxes. The biggest part is the elastic...1/4" flat elastic from Walmart is under $3, so if you can't find anything around the house, you can purchase some and make several.
I asked my neighbors if they had any cereal boxes, because I don't buy cereal in boxes very often. I got exactly what I needed! Any lightweight cardboard box will work if it's big enough, check the cupboards and rock what you've got!
Hanging Scroll Wall Art
Get creative with this scroll art! I used some scrap wood in the garage, but you can upcycle a wood ruler or yard stick...or even use multiple layers of cardboard glued together.
Have the kids draw a picture, paint their hands and stamp them on paper, or paint your own creation and then finish it off as the perfect gift.

Handmade Envelopes
Handmade cards and envelopes can add the perfect touch to top a gift, give a gift card or just write a heartfelt letter. Honestly, so many of us just need a sincere card with a heartfelt message.

How to Make a 2468 Box!
-min.jpg)
Wood Slice Lettering
This darling sign with hand lettering can be created with wood scraps from the burn pile...just add some watercolors, markers or even food coloring. Then add some hand lettering.

Glitter Jars
This fun craft needs some clear glue, glitter and a jar. Most likely you have some of those things already. If not, head to your dollar store and pick up a couple things. It's surprisingly relaxing to watch the spinning glitter dance and swirl.

Coffee Filter Flower
Color some coffee filters with food coloring and make a giant flower for a wreath--just add staples. This gorgeous flower used 115 coffee filters, but 100 would work too--and can be purchased at the dollar+ store easily.
Leave them natural and have a fabulous flower in white. Perfect for January decor.

Handmade Notepad
When I was little I loved drawing flip books! Make your own notepad as the perfect gift. Invite the recipient to make a flip book or make one for them.
A notepad is pretty useful too! Just needs paper--and some modpodge, which is available at the dollar store.


-min.jpg)


Comments