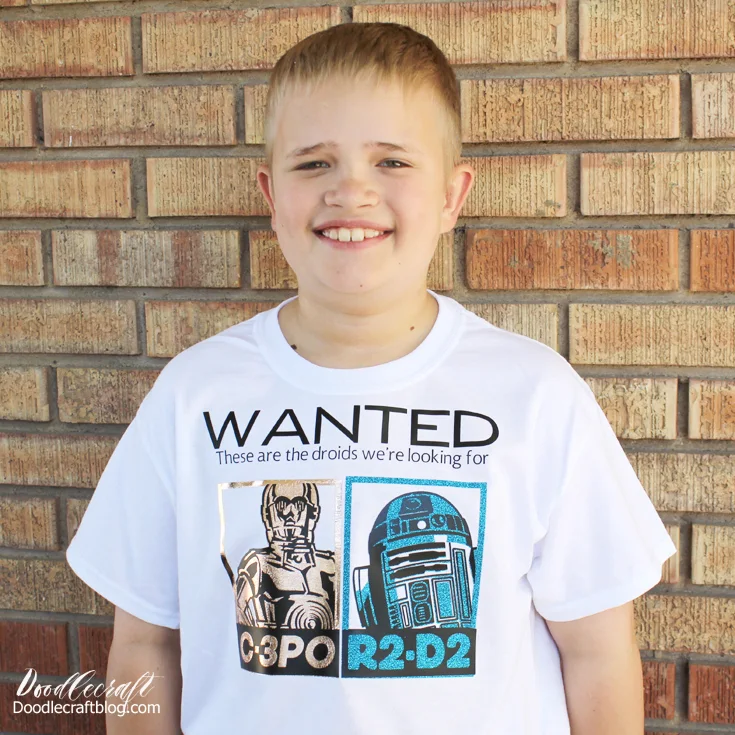
Star Wars C3PO & R2D2 Droids Wanted Iron On T-Shirt with Cricut!
These are the droids we're looking for.
I love Star Wars...if you've been around Doodlecraft before, you'll know that geekery crafts are a staple here...check out the geekery tab at the top bar for more. So, Cricut just released some fun Star Wars images and they are awesome! They are easy to purchase (not included in Cricut Access, even for me)...but they are totally worth it!
I'm using supplies from Cricut, affiliate links included.
I used shiny gold iron-on vinyl and glitter vinyl...but my son didn't seem to mind, because C3PO is gold...and R2D2 is blue...and maybe shiny. Anyway, the shirt speaks for itself, it is amazing.
Gather Supplies:
White T-Shirt
Set the Iron-On vinyl plastic side down on the mat and make sure to mirror the images. Next, cut out the images and then weed out the excess vinyl with the hook tool.
Take time to weed out all those little places, it's a bit tedious, but worth it.
Heat up the EasyPress to the recommended setting for the vinyl. Then warm up the shirt for 15 seconds.
Then place the Wanted and the text phrase on the shirt and heat for 30 seconds at 305*.
Keep the plastic covering over the letters for now.
Next, line up the Gold C3PO and Blue R2D2 on the shirt. I changed my mind when I weeded them, that I wanted their names to show up in their colors, so that's why I didn't remove the letters.
Place the black vinyl over the top to make sure that the gold and blue is lined up...then remove the black vinyl before ironing.
Use the EasyPress on each half of the shirt for the recommended time. (Foil needs less heat and time than glitter)
Then let the vinyl cool and remove the plastic over the gold and the blue.
Now add the black vinyl. At this point, I was thinking...all that black is going to cover up the shimmer and shine of the vinyl underneath...so, I decided to cut some of it off.
I used scissors and cut the black vinyl borders right off the images.
Then I could line them up and more of the shimmer would show.
Cover with a Teflon sheet, since some of the vinyl is exposed.
Use the EasyPress right on top of the Teflon for the recommended time.
Repeat in like manner for the other side.
Turn the shirt over and heat it up for about 15 seconds. Then let the shirt cool down completely.
Next, peel off the plastic coatings and the shirt is done!
It looks amazing! It is shiny and sparkly...but super cool. This is the Star Wars shirt you are looking for!
I love to create custom shirts in mere minutes using my Cricut Explore Air™ 2 machine.
Have you made custom shirts before? They are simple and easy to make. Once you buy the supplies, it's easy to make several shirts and save money in the long run. If you have been on the fence about getting a Cricut Explore Air 2, check out this post on making money with your Cricut!
Like, Save, Share, Comment, Follow and Pin!


This post published on Doodlecraft first


-min.jpg)


Comments