
I'm excited to be part of Luke's Loves and Project Linus and today!
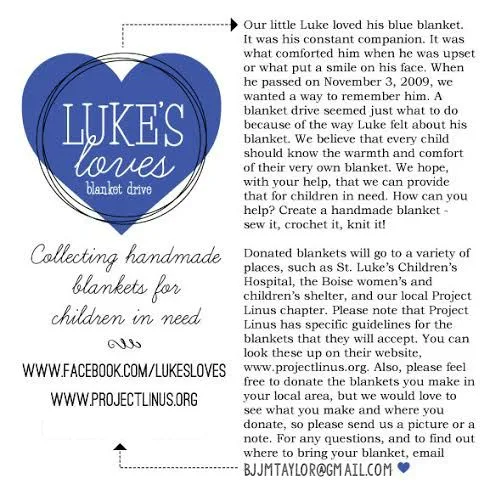
Project Linus is a blanket drive organization that collects handmade blankets to
give to children facing serious health or other hardships.
Project Linus is a blanket drive organization that collects handmade blankets to
give to children facing serious health or other hardships.
You can make blankets and donate them at a local chapter...or mail them in.
There are many ways to help...and it would make a fun service activity!
Check the website for more information
About 12 years ago I bought everything I needed to make this blanket.
And there it sat...getting older and older.
I bought 12 adorable striped bandannas.
And had this fluffy but sturdy fleece for about as long.
~
So, make it your goal to finish one of the projects you've started today! ;)
So, for this amazingly simple blanket I used 12 bandannas and a big piece of fleece to match.
The fleece I found it extra thick and sturdy, so, I didn't use any cotton batting at all!
I decided to do the pink stripes vertical and the blue stripes horizontal.
I did 4 rows of 3 bandannas.
I'm always super thrilled when all 4 squares match up perfectly!
Here's the easiest way to quilt this sucker.
Put the wrong sides together...so the finished surfaces are visible.
Trim the backing edge so there is about a 1 inch border around the entire quilt.
so you won't have to remove them when sewing.
Just sew each and every seam line.
Because there is no batting, it fits just great!
This would be a fantastic picnic blanket!
And, best part...it's easy to wash because let's be real here.
If it can't be machine washed, it doesn't belong in my house!
I want to make another one--and this time I'll finish it in less than 12 years!
These would be a great gift!
This is also a great beginning sewing project...
maybe for a daughter to make for someone for Christmas!
Or, make a bunch for Project Linus!

Here's more great Blanket ideas!


This post published on Doodlecraft first

-min.jpg)


Comments