This post is sponsored by Plaid. All opinions and ideas are 100% mine. Affiliate links included. #plaidcrafts #folkart
Mystic Halloween Party with Plaid FolkArt Paint
Celebrate Halloween with a mystic floral party featuring Plaid FolkArt Paint! FolkArt Paint makes it easy to tie your Halloween party together with gorgeous matching elements. Upcycle old Halloween decorations and make them all match your aesthetic using FolkArt Paint.
This is my most photo dense post ever! I've got over 50 photos to showcase all the fun elements of this party set up.
Gather all those old Halloween decorations that are collecting dust and paint them all to match your theme! I love loose florals and thought they would make the perfect look for this mystic Halloween party. They tie the decor together perfectly, all the colors match and the tombstones look real!
Let's get started crafting!
Here's a video of the entire party decoration process! Each individual project will be posted on my instagram reels too, so head here to check them out!
Halloween Party Craft #1: Skulls Painted Three Ways!
These iridescent skulls are so cool, shimmery and have a really sweet mermaid vibe. Paint them and leave them like this or add some little embellishments to them. Here we go!
How to Paint an Iridescent Skull
Supplies Needed for the Iridescent Skull:
Plastic Skull
FolkArt Dragonfly Glaze Paint (at least 3 varieties)
Paint Brushes
Step 1: Black Paint
Begin by painting the entire skull in the thick, creamy black FolkArt paint. I love the Outdoor paint because it is so durable, but Multi-Surface paint would work wonderfully too.
Then let the black paint dry completely. Repeat the process for a few skulls, remember 2 heads are better than one! ;)
Step 2: Make it Shimmer!
After the skull has dried, it's time to make it shimmer. Use the Dragonfly Glaze and paint the variety of colors on the skull in small patches, alternating the colors. This will give it the iridescent effect with the micro glitter shimmer.
It looks like it's coated in one finish that reflects light and color spectrum differently...but look closer. You can see the Violet-Blue-Green shift, the Blue-Green-Gold shift, and the Red-Violet-Blue shift in there.
This technique is perfect for so many glittery applications!
Okay, leave the skull head like this...or kick it up a notch with 3 varieties of decorations!
Halloween Skull #1: Crystal Skull
Supplies Needed for the Crystal Skull:
Hot Glue Sticks
Razor Knife
Mod Podge
Variety of FolkArt Paint (purple, aqua and green)
Hot glue/Gun
Use the razor knife to cut the cold (hot) glue sticks into crystal shapes. More instructions on this post if you are interested.
Then mix up some Mod Podge with a little bit of paint and paint a few of the crystals. They will dry mostly clear with a tiny bit of color...perfect for a crystal skull.
Use a hot glue gun to adhere the crystals to the skull. It's creepy and cool!
Halloween Skull #2: Silk Flower Skull
Silk flowers are cheap and easy to find--you probably have some sitting in a corner somewhere! They are usually pretty cheap looking and need to be amped up for the perfect party decor.
Step 1: Disassemble Silk Flowers
Begin by pulling the silk flowers apart carefully, layer by layer. Remember how they go together so you can reverse the process after painting.
Lay the petals out on a disposable or washable surface and begin painting broad and messy strokes of your color scheme paint on the silk petals.
Step 2: Paint!
**This is messy!
The paint will bleed right through the petals and essentially paint both sides at once. This is a great way to make a Monet look that will match your decor.
Don't be too precious about painting them, just slab on some paint and move on.
Repeat the painting for all the layers of silk flowers. Then let them dry completely. The paint will stiffen the silk petals a bit and actually make them lay better for the finished product.
Step 3: Assemble!
After the flowers are dry, reassemble them with the stem, basket and backing. See how cool they look? They match the party theme and have an artistic or spooky vibe!
Step 4: Decorate!
Finally, use some hot glue to attach a flower to the iridescent painted skull. This is a fun way to do a Sugar Skull effect too!
Just like that, this skull is ready to party!
Halloween Skull #3: Loose Florals
I think my most favorite thing in the world, besides pizza and dark chocolate, is loose florals. They are so much fun to paint! They take pretty much zero skill and look fabulous!
Just pick the colors of paint to match your decor and party and use a round brush to apply the paint to the skull.
How to Paint Loose Florals:
Step 1: Pick a dark shade of paint and use a round brush to glob "C" shaped petals around in a circle...loosely resembling a rose.
Step 2: Pick a light shade of paint and use a round brush to glob "C" shaped petals around the dark petals painted. Work while dark paint is still wet to allow for some blending.
Step 3: Pick a green paint and add "tear" drop or "leaf" shapes for leaves, typically done in one or two strokes with a round brush.
Step 4: Add some Dragonfly Glaze or Metallic FolkArt paint to add shimmer to the flowers just painted.
I love how they kind of have a sugar skull vibe!
Iridescent skulls decorated 3 ways! Which one is your favorite? Or would you just leave them as iridescent skulls?
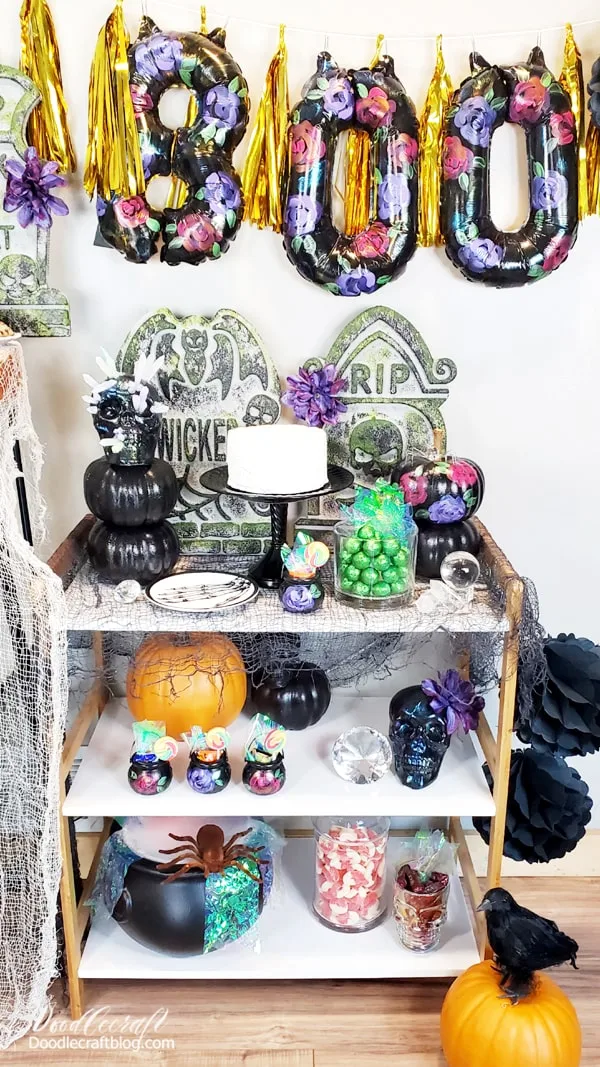
I love the cohesive look of this party. It's so nice to take unmatching elements from the store, yard sales or your attic and make them look like they all go together for the perfect Hauntingly beautiful party!
Matching Loose Florals on Everything!
Paint loose florals on all your decor!
Again, this is the perfect way to tie everything together and make it one big party.
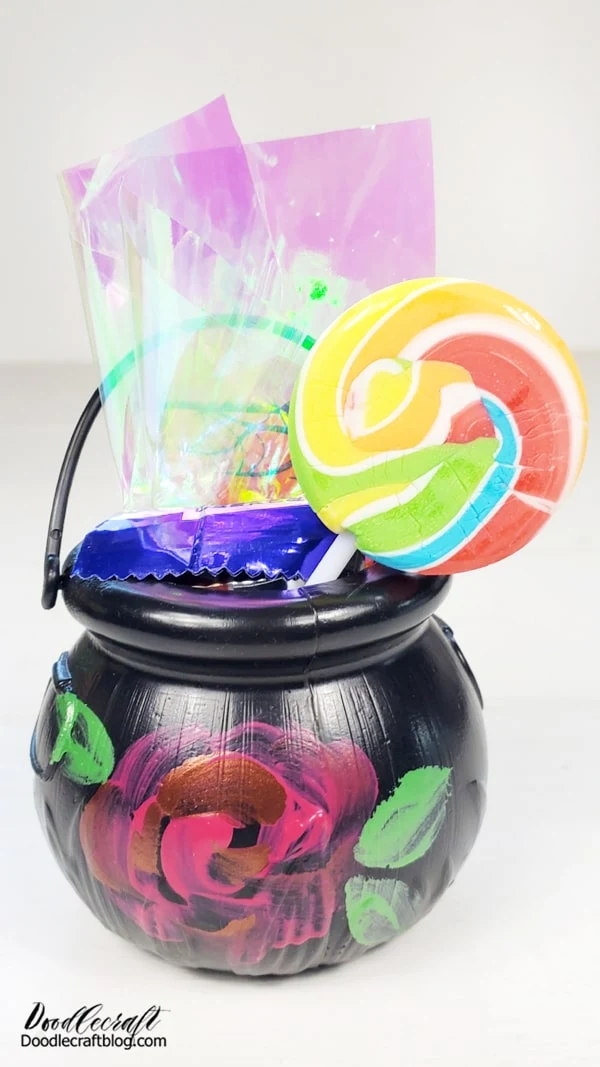
- Add some big loose roses to mini cauldrons for take home party favors.
Some iridescent tissue paper is the perfect finishing touch for stuffing these mini cauldrons with treats!
I just love those mini cauldrons!
How to Paint Loose Florals on a Pumpkin:
Add big loose florals to pumpkins! This is a great technique for real or fake pumpkins! I love the dollar store pumpkins, but they are so Styrofoam and bright orange...they need a little help.
Supplies Needed for Loose Floral Pumpkin:
Foam Pumpkin
FolkArt Dragonfly Glaze Paint (at least 3 varieties)
Paint Brushes
Variety of FolkArt Paint
Branch for stem
Hot Glue/Gun
Step 1: Paint it Black
Begin by removing the stem and painting the pumpkin black. Just like the skulls above.
Step 2: Loose Florals
Pick a dark shade of paint and use a round brush to glob "C" shaped petals around in a circle...loosely resembling a rose.
Pick a light shade of paint and use a round brush to glob "C" shaped petals around the dark petals painted. Work while dark paint is still wet to allow for some blending.
Pick a green paint and add "tear" drop or "leaf" shapes for leaves, typically done in one or two strokes with a round brush.
Add some Dragonfly Glaze or Metallic FolkArt paint to add shimmer to the flowers just painted.
Last step: Stem
Cut a branch from nature and hot glue it right on top of the pumpkin! So cute!
Have you tried painting big loose florals? They are seriously so simple and fun, perfect for any age or skill level. Give it a try and then you'll want to paint them on everything--especially if you have some FolkArt Dragonfly Glaze to finish them off with!
How to Paint Loose Florals on Mylar Letter Balloons:
Add some big loose florals to mylar balloons to set the scene of the party!
Yes, this says 800, but be creative and buy number balloons and make them work for your party. Anyone who commented on them got a blank stare and response "it says BOO".
Step 1: Paint the Balloon
Open up the package and set the balloon on your work space. Paint the whole thing with Black FolkArt Outdoor Paint, leaving some streaking of metallic to show through.
Essentially, these balloons can match any party you throw based on how you paint them!
Let the paint dry completely.
Step 2: Flowers
Then using the same loose floral technique that's been outlined multiple times in this post, paint those flowers on it!
Let them dry completely. Then inflate them and hang them up with a tassel bunting!
Add a few honeycomb balls, black crows and crystals and the party is almost perfect! Let's finish it off with these cool and realistic mossy tombstones!
How to Paint Creepy Tombstones:
These tombstones make the perfect party backdrop and would look great in the yard too. I love the actual mossy effect that makes them look so realistic.
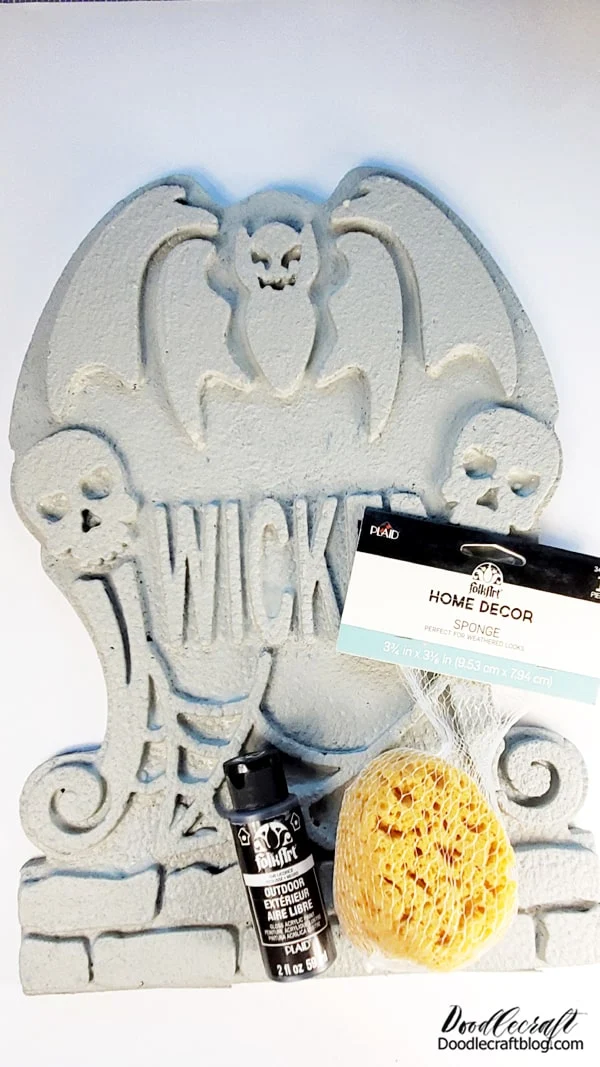
Supplies Needed for Halloween Tombstones:
Foam Tombstones
FolkArt Painted Finishes in Light Concrete and Spanish Moss Effects
Paintbrushes
Foam tombstones look pretty hokey to me. They are very styrofoam looking with big cells visible and a pretty poor mass-produced paint finish. There's usually chunks missing which looks sloppy too.
Step 1: Paint with Mod Podge
Begin by covering the entire tombstone in clear Mod Podge. This will help cover the cell look, keep the glitter in place and help the paint coat it in an even layer.
Next paint the entire tombstone with the light cement FolkArt Painted Finishes paint. Let it dry completely.
Then sponge on some Black FolkArt Outdoor Paint on the high areas. Finally use the stencil brush to apply the FolkArt Painted Finishes moss effect paint on the top edges of the tombstone. I love this stuff!
It looks just like moss and that bright green matches my Halloween party decor perfectly. Add your own glitter, rhinestones or flowers if you want!
I love projects like this that add so much visually, but take very little skill or time. That's my kind of crafting!
Put the whole mystic flowery party together! Add a cake, cookies, candy and maybe your favorite Halloween themed foods. I love having a decorated serving area because it shows my guests all my decorations in one place!
If you are setting big tables, add the same decorations to the centerpieces and place settings.
Then shop your house!
Find things around your house that match the theme of the party. Serving bowls, plates, and other elements that you don't have to rush out and buy.
I love crystals, glass and anything sparkly...and guess what!? So do kids! These crystals and glass gems get so many compliments...mostly of my party guests wanting to keep them.
Just dim the lights and kick of the fog machine for the perfect spooky ambiance!
Lastly, we filled the cauldron with colorful misty fog, which is the biggest hit! Which element is your favorite part?
Make all your Halloween party decorations match and coordinate with each other using Plaid FolkArt craft paints. Achieve amazing stone-like effects, moss, iridescent shimmers and more using FolkArt paint.
After the party, these all make perfect Halloween decorations and can stay up all month long!
That's it, hope you loved it and got inspired to paint the perfect decorations for your Halloween party! Check out Plaid Online for all your paint crafting needs. They are stocked in every craft retailer, plus big box stores. Ordering online at Plaid or Amazon is the way I go!
Please like, pin and share!
Check out and follow Plaid on all the social sites for all the creative inspiration!


-min.jpg)


Comments