How to Make a Handmade Card with TGF


This post may contain affiliate links, sponsored content and products received at no cost.
6:00 AM
I love card making. It's relaxing and simple. When the adult coloring craze hit, I stayed true to just coloring stamped images and making handmade cards. Make a handmade card and mail a smile to someone today!

How to Make a Handmade Card with TGF Rubber Stamps!

I love card making. It's relaxing and simple. When the adult coloring craze hit, I stayed true to just coloring stamped images and making handmade cards. Make a handmade card and mail a smile to someone today!

I love card making. It's relaxing and simple. When the adult coloring craze hit, I stayed true to just coloring stamped images and making handmade cards. Make a handmade card and mail a smile to someone today!

I've posted about The Greeting Farm stamp images before. I love them. They are the perfect size for cards, they are absolutely adorable and they fit every occasion. This image is Holiday Anya 6. I love her comfy sweater and cup of hot cocoa, perfect for sweater weather.

I've posted about The Greeting Farm stamp images before. I love them. They are the perfect size for cards, they are absolutely adorable and they fit every occasion. This image is Holiday Anya 6. I love her comfy sweater and cup of hot cocoa, perfect for sweater weather.

Supplies Needed for Handmade Cards:

Scissors

Supplies Needed for Handmade Cards: TGF Rubber Stamp Memento Black Ink Pad Clear Stamping Block White Cardstock Tombow ABT PRO Alcohol Based Markers Colored Cardstock Washi Tape Tombow Foam Tape Scissors

Making a Handmade Card Step 1:

Stamp the image on thick, white cardstock with the memento ink. 

Making a Handmade Card Step 1: Stamp the image on thick, white cardstock with the memento ink.

Making a Handmade Card Step 2:

Next color the skin of the image. I love using the palest colors in the palette...but probably because I'm a pale white girl. Pick one color for the skin and add circles for the cheeks. Then go in with the same skin color and layer on the shadows around the face and side of the neck.

Making a Handmade Card Step 2: Next color the skin of the image. I love using the palest colors in the palette...but probably because I'm a pale white girl. Pick one color for the skin and add circles for the cheeks. Then go in with the same skin color and layer on the shadows around the face and side of the neck.

Making a Handmade Card Step 3:

Now pick 3 colors for the hair; light, medium and darkest. Color the entire hair with the lightest colors. Then layer in the medium shade and finally the darkest shade, in little hair-like lines. Follow the curve of the hair and keep the shape of the lines similar.

Making a Handmade Card Step 3: Now pick 3 colors for the hair; light, medium and darkest. Color the entire hair with the lightest colors. Then layer in the medium shade and finally the darkest shade, in little hair-like lines. Follow the curve of the hair and keep the shape of the lines similar.

Making a Handmade Card Step 4:

Color all the clothes and accessories. Use one or 2 colors to add highlights and shadows, or just layer the same color on top. The beauty of alcohol based markers is they layer seamlessly. 

Making a Handmade Card Step 4: Color all the clothes and accessories. Use one or 2 colors to add highlights and shadows, or just layer the same color on top. The beauty of alcohol based markers is they layer seamlessly.

Making a Handmade Card Step 5:

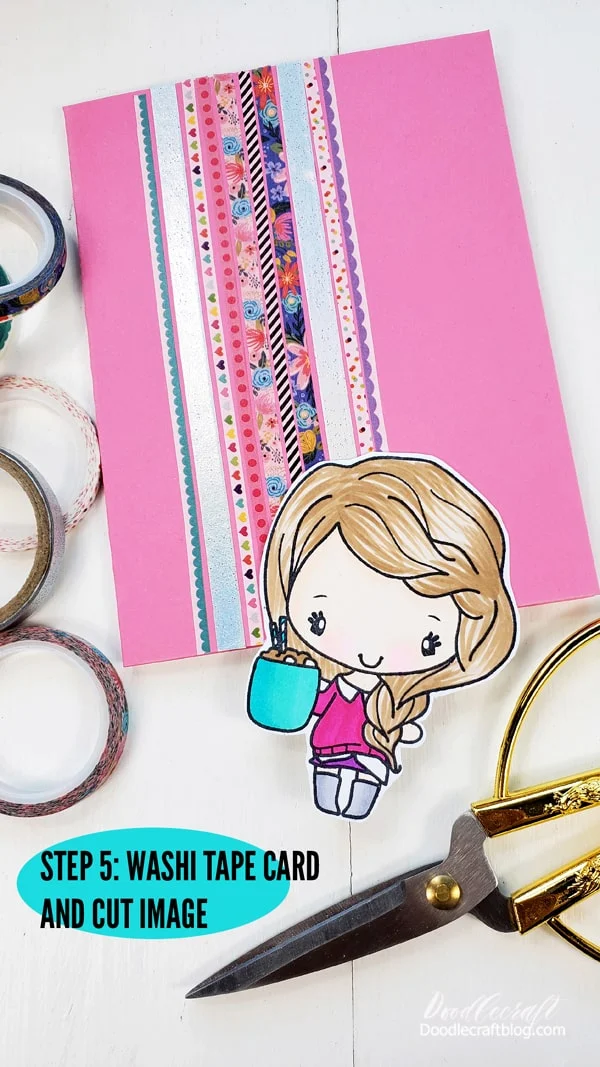
Next, fold half a sheet of cardstock in half for the card base. Add strips of brightly colored washi tape to the card. Use detail scissors to cut out the image, leaving a little border.

Making a Handmade Card Step 5: Next, fold half a sheet of cardstock in half for the card base. Add strips of brightly colored washi tape to the card. Use detail scissors to cut out the image, leaving a little border.

Making a Handmade Card Step 6:

Then stick a few strips of Tombow Foam Tape to the back of the image. I love foam tape and go through loads of it every month! The dimension it gives is wonderful--plus, it can still go through the mail!

Peel off the tape backing and stick the TGF image on the front of the card, slightly on the washi tape.

Making a Handmade Card Step 6: Then stick a few strips of Tombow Foam Tape to the back of the image. I love foam tape and go through loads of it every month! The dimension it gives is wonderful--plus, it can still go through the mail!  Peel off the tape backing and stick the TGF image on the front of the card, slightly on the washi tape.

That's it! A gorgeous handmade card is easy to make and would bring a smile to anyone that receives it. This cute image would make a great tag for a gift of hot chocolate, a mug and some marshmallows. 

Like, Pin and Share!


That's it! A gorgeous handmade card is easy to make and would bring a smile to anyone that receives it. This cute image would make a great tag for a gift of hot chocolate, a mug and some marshmallows.


I love making altered notebooks. They are a fun way to set apart a boring old composition book in the back-to-school section. Make decorative altered notebooks using rubber stamps from The Greeting Farm.


facebook Follow Me on Pinterest Youtube Instagram twitter 
postscript

Comments